 Buy Now →
 Ninja Creami Peanut Butter Protein Ice Cream
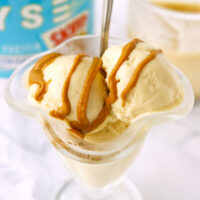
Easy to make, ultra-creamy and full of decadent peanut butter flavors, this low calorie Ninja Creami Peanut Butter Protein Ice Cream has 35 grams of protein and will satisfy your cravings!
- Prep Time: 5 minutes
- Freezing Time: 24 Hours
- Cook Time: 0 minutes
- Total Time: 24 hours 5 minutes
- Yield: 1 1x
- Category: Desserts
- Method: Freeze
- Cuisine: American
- Diet: Low Calorie
Ingredients
Scale
Ice Cream Base
- 100ml / 3.5 fluid ounces Ultra-Filtered Low-Fat Milk (such as Fairlife 2% Milk – note 1)
- 250ml / 1 cup Unsweetened Vanilla Almond Milk (or any nut, plant-based milk or other milk of choice)
- 39 grams / 1 scoop Ryse Skippy Peanut Butter Protein Powder (note 2)
- 10 grams / ≈ 1.5 TBSP PB2 Powdered Peanut Butter
- 18 grams / 1.5 TBSP granulated White Sugar Replacement, to taste (I used Lakanto Monkfruit Sweetener – note 3)
- ¼ TSP Guar Gum (note 4)
- ⅛ TSP Xanthan Gum (optional – note 4)
Optional Mix-ins:
- Roasted Peanuts – chopped
- Reeses’s Mini Peanut Butter Cups – chopped
- Chocolate Chips
- Peanut Butter Chips (store-bought or homemade – see note 4 for instructions on how to make)
Optional Toppings:
- Drizzle of Peanut Butter (unsalted and unsweetened, or use melted commercial peanut butter such as Skippy or Jif)
- Smucker’s Sugar Free Chocolate Sundae Syrup
- Whipped Cream
- Reese’s Pieces
- Nutter Butter Bites
Instructions
- Combine the base ingredients: Add the ultra-filtered low-fat milk, unsweetened vanilla almond milk, peanut butter protein powder, powdered peanut butter, white sugar replacement, guar gum and xanthan gum to the Ninja creami container. Use a handheld frother or immersion blender to blend until evenly combined. (Alternatively, use a mini blender or food processor to blend the ingredients and then pour into the creami container.)
- Freeze: Place the container in the freezer on a level surface and freeze for 24 hours until frozen solid (note 5).
- Prepare for spinning: Remove the pint and set on the counter for 3-5 minutes. Then run the bottom of the container under hot water from the sink for 30-60 seconds to help loosen up the icy edges from the sides of the container. Pat-dry, then remove the pint lid and place the container in the outer bowl. Lock the lid.
- Spin: Turn on your Ninja Creami and install the outer bowl into the machine. Press the “Light Ice Cream” button for the first spin. The ice cream will come out looking powdery and crumbly and not completely creamy. This is perfectly normal.
- Shave down ice walls and re-spin: Eject the outer bowl and remove the pint. Run a butter knife around the edges of the container to help incorporate any icy parts into the ice cream. Place the pint in the outer bowl again. Cover and lock the lid. Reinstall into the machine and press the “Re-spin” button.
- Add mix-ins (optional): Eject the outer bowl from the machine and remove the lid. If adding any mix-ins, make a hole in the middle of the pint using the butter knife and push down your mix-ins of choice. Cover and lock the lid. Reinstall into the machine press the “Mix-In” cycle button.
- Enjoy! Remove the pint from the machine. Smooth the top with a spoon then scoop into serving dishes if you like. Top with desired toppings and enjoy!
Equipment
Buy Now → 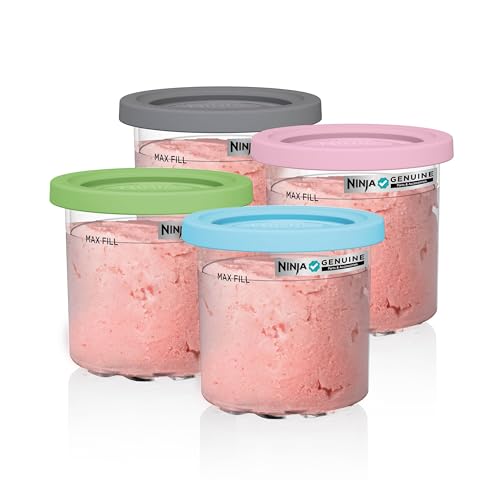 Buy Now →
  Buy Now →
  Buy Now →
RYSE Skippy Peanut Butter Protein Powder
Buy Now →Notes
- Ultra-Filtered Low-Fat Milk. I used Paul’s Hi-Calcium Low-Fat Milk which is an ultra-filtered long life Australian milk available in some parts of Asia. Ultra-filtered milk is higher in protein than regular milk and has less calories, making it a great choice for healthy low calorie Ninja creami ice creams. Milk with a high protein content also results in a creamier and thicker ice cream consistency. If you’re in the USA or Canada, you can use Fairlife 2% milk or any low-fat ultra-filtered milk from other brands such as Kroger CarbMaster, Organic Valley, Joyya, etc. If you live elsewhere, use any low-fat, semi-skimmed (2% milk) or regular whole milk. I don’t recommend using a fat-free milk or only almond milk as it will result in more ice crystals forming. The ice cream will not be as thick and creamy as you do need some fat to help with the texture.
- Ryse Skippy Peanut Butter Protein Powder. A whey protein powder with by far the BEST peanut butter flavor compared to other brands!! I tried several brands but Ryse Supplements Skippy Peanut Butter Protein Powder was the clear winner in terms of peanut butter flavor and texture! The protein powder will flavor and also thicken the ice cream. See the ‘Variations’ section in the post above if you’d like to use unflavored or vanilla protein powder or a protein shake instead.
- White Sugar Replacement. I used Lakanto Monkfruit Sweetener with Erythritol. Feel free to use any other sugar-free sweetener of choice made from allulose, stevia, etc. Or you can use regular granulated white sugar or a natural sweetener instead like maple syrup or honey if preferred.
- Guar gum and Xanthan Gum. Guar gum thickens the ice cream base and reduces the formation of ice crystals. It also helps in creating a scoopable ice cream texture. Xanthan gum serves a similar purpose as the guar gum. I find using both of these stabilizers together yields the best texture. However, this depends on the type of protein powder you’re using and what stabilizers are already incorporated in it. I recommend omitting the xanthan gum the first time if using a different brand of protein powder. You might not need it and too much of any type of stabilizer can result in a stringy or gummy texture. If you prefer not to use stabilizers in their natural form, you have a few options:
- Use 1 tablespoon of vanilla flavored sugar-free instant jello pudding mix. It already has stabilizers/emulsifiers such as soy lecithin or xanthan gum in it. Keep in mind that pudding mix is already sweetened so you will likely need less sweetener.
- Use cottage cheese or cream cheese. Use ½ cup (80-90 grams depending on the brand) low sodium or unsalted cottage cheese or use cream cheese (1 ounce / 28 grams). I promise you won’t be able to taste it!
- Ice cream consistency. For ice cream with a soft serve consistency, spin 2 times on the “Re-spin” setting after the initial “Light Ice Cream” cycle. However, be careful as the friction and heat caused by multiple rounds of the “Re-spin” cycle may make the texture too melty and possibly stringy. I recommend processing the ice cream immediately after removing from the fridge and briefly running the bottom of the container under hot water. This way the ice cream won’t be too melty even if you are spinning on “Re-spin” multiple times.
- Make ahead. The ice cream base can be made and frozen up to 2-3 weeks in advance. Note that the longer it is stored in the freezer the more ice crystals can form and the less sweet it will become over time. That said, I have frozen ice cream bases for 2-3 months and they still turn out well!
- To make homemade peanut butter chips/peanut butter chunks: Add natural peanut butter (the runny kind that is unsalted and unsweetened) to a small ziplock bag. Seal and flatten the bag, then freeze for 24 hours. After processing your ice cream on the “Lite Ice Cream” and “Re-spin” cycle, make a hole in the center of the pint and run the knife around the edges again. Break the frozen peanut butter slab into small pieces and push them all the way down in the hole and on the sides of the creami pint so that they don’t get pulverized. Spin on the “Mix-in” cycle. Alternatively, you can mix in the frozen peanut butter pieces by hand after the “Re-spin” cycle.
- Storing leftovers. If you can’t finish the ice cream, level and smooth out the top in the container with the back of a spoon. Cover and refreeze. It will freeze solid again. When ready to enjoy the leftovers, spin on “Light Ice Cream” again. DO NOT spin on the “Re-spin” function as the ice cream has frozen back into its original state. Using the “Re-spin” function when the mixture is solid can damage the machine and the paddle.
- Nutrition information. The nutritional information provided is an estimate for the ice cream base only. The information will vary with any ingredient substitutes and if adding any toppings or mix-ins.
- See the ‘Variations’ section in the post above for more tips on customizing this peanut butter protein ice cream.
Nutrition
- Serving Size: 1 pint
- Calories: 278
- Sugar: 8.6g
- Sodium: 467.4mg
- Fat: 8.4g
- Saturated Fat: 2.8g
- Unsaturated Fat: 5.5g
- Trans Fat: 0.1g
- Carbohydrates: 11.5g
- Fiber: 3.3g
- Protein: 34.8g
- Cholesterol: 54.9mg


