Print

Juicy Baked Chicken Breasts

A sliced seasoned baked chicken breast in a white plate garnished with chopped parsley.

5 Stars 4 Stars 3 Stars 2 Stars 1 Star

5 from 4 reviews

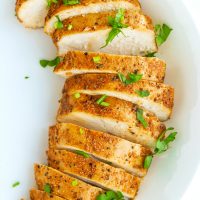
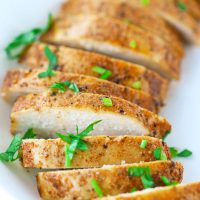
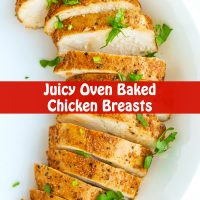
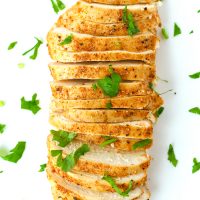
Learn how to make tender, perfectly seasoned, juicy baked chicken breasts in the oven with an easy method that works every time! You can cube, shred, or slice them, and then use for meal prep and in sandwiches, salads, pastas, soups, etc.!

Ingredients

Scale
  • 4 Chicken Breasts, boneless, skinless – cleaned and pat-dried with paper towels
  • 1.52 TSP Kosher Salt, to taste
  • 1 TSP freshly cracked Black Pepper
  • 1 TSP Paprika
  • 1 TSP Garlic Powder
  • 1.5 TBLS Olive Oil (or any cooking oil you prefer) – for brushing on the foil and chicken breasts

Instructions

  1. Preheat oven to 350°F/175°C. Line a baking tray with a sheet of aluminum foil and brush lightly with about a half tablespoon of olive oil (or any other cooking oil you prefer). (Note: If your chicken breasts are on the larger side and over 7 ounces / 200 grams each, I recommend pounding them with a meat mallet until they are about half an inch thick to promote even cooking.)
  2. Combine kosher salt, freshly cracked black pepper, paprika, and garlic powder in a small bowl. Mix with a spoon or use a small whisk to combine the spices and seasonings until fully integrated.
  3. Brush the remaining olive oil on the chicken breasts, then sprinkle the seasoning mixture on both sides until they are fully coated. You can use your fingers to rub the seasoning into the breasts. (The oil helps to keep the chicken breasts juicy during baking and allows the seasonings to better stick to them.)
  4. Place the chicken breasts (plump side up) on the foil lined baking tray and bake for 20-22 minutes, turning once using tongs halfway through, or until the chicken has fully cooked through. You can make sure that they are fully cooked by piercing the thickest part of the breasts with an instant read thermometer. It is safe to consume once it reads 165°F/75°C.
  5. Remove the baking tray from the oven and let the chicken rest for 10-12 minutes to lock in all the juices. Transfer the chicken breasts to a chopping board, making sure to let any extra liquid/juices drip onto the foil before placing them on the board. Use a sharp knife to cut into cubes, slice, or shred with two forks.
  6. Store in an airtight container in the refrigerator for up to 3-4 days, or freeze in individual and portioned storage containers or freezer bags for up to 3 months.

Equipment

Notes

  1. Fresh vs. Frozen chicken breasts: You can use fresh or frozen. If using the latter, be sure to thaw the chicken breasts completely before proceeding with the recipe.
  2. Brining: Brining in a saltwater solution will break down the chicken fibers, which will result in more tender cooked chicken breasts. However, it is optional and not compulsory. If you would like to brine your chicken breasts first, dissolve ¼ cup kosher salt in 1 quart of water in a large bowl and add the chicken breasts. Allow the chicken breasts to sit in the brine for 30 minutes to up to an hour, then rinse them thoroughly with cold water. Pat-dry with paper towels and proceed with the recipe as per normal.
  3. Cook time variations: Depending on the thickness and size of your chicken breasts, the cook time will vary and range from 18-22 minutes when cooking at an oven temperature of 350°F/175°C. If you have smaller chicken breasts, the cook time may range from 15-18 minutes. It’s best to check with a food thermometer to ensure that your chicken breasts have reached an internal temperature of 165°F/75°C and is safe to eat. I highly recommend Thermapen Mk4 by ThermoWorks. You can get a quick and accurate reading with it very easily.
  4. To thaw cooked frozen chicken breasts: Defrost in the fridge overnight or until fully thawed. Reheat in a pan on the stovetop or in the microwave for a minute or two, then use as per your needs.

Nutrition