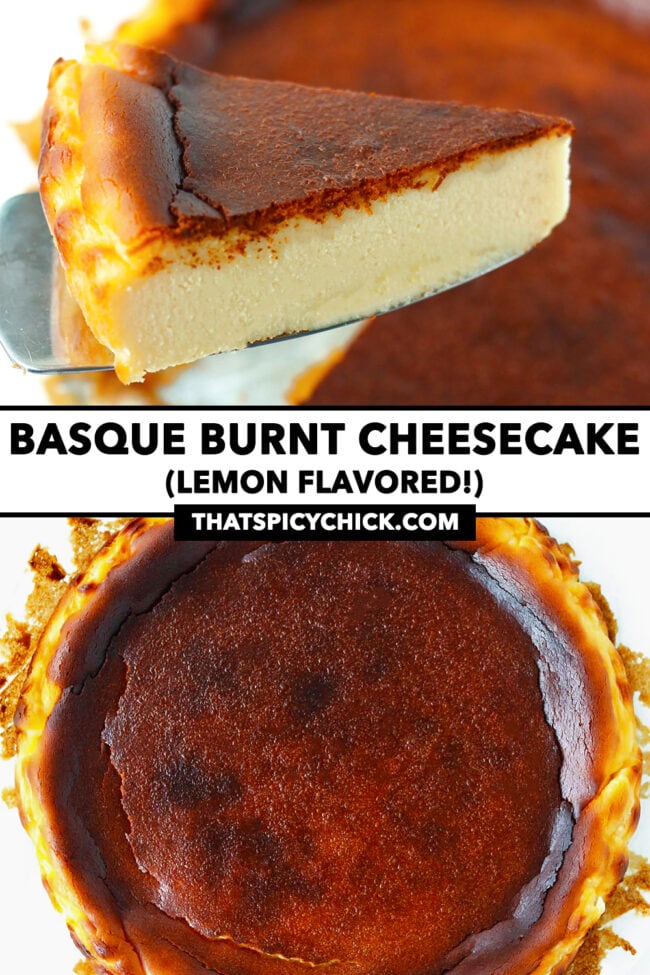
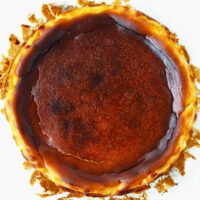
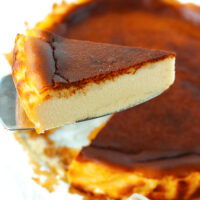
Lemon Basque Burnt Cheesecake
This post contains affiliate links.
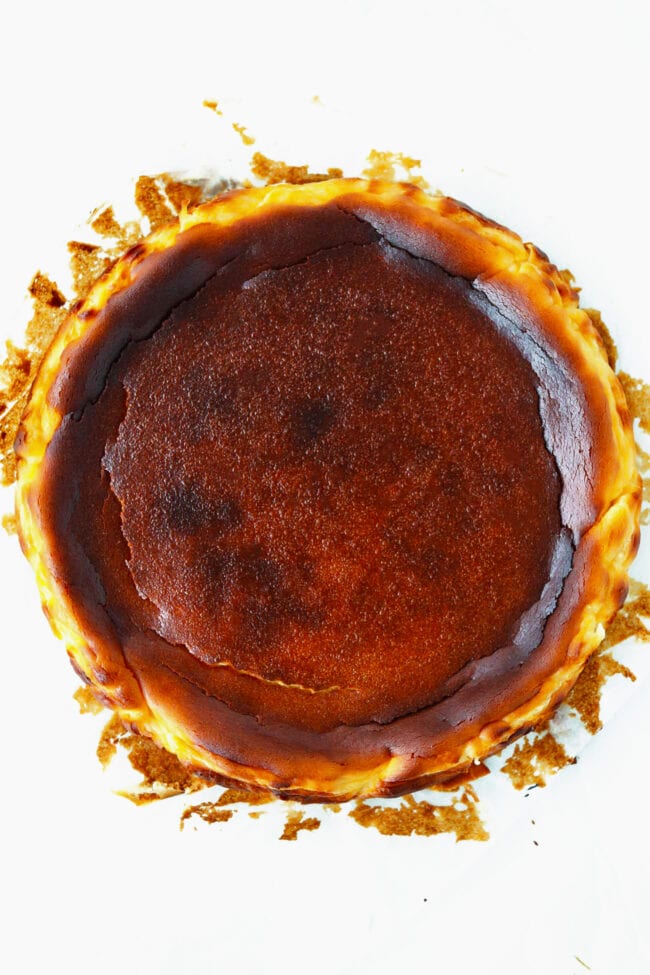
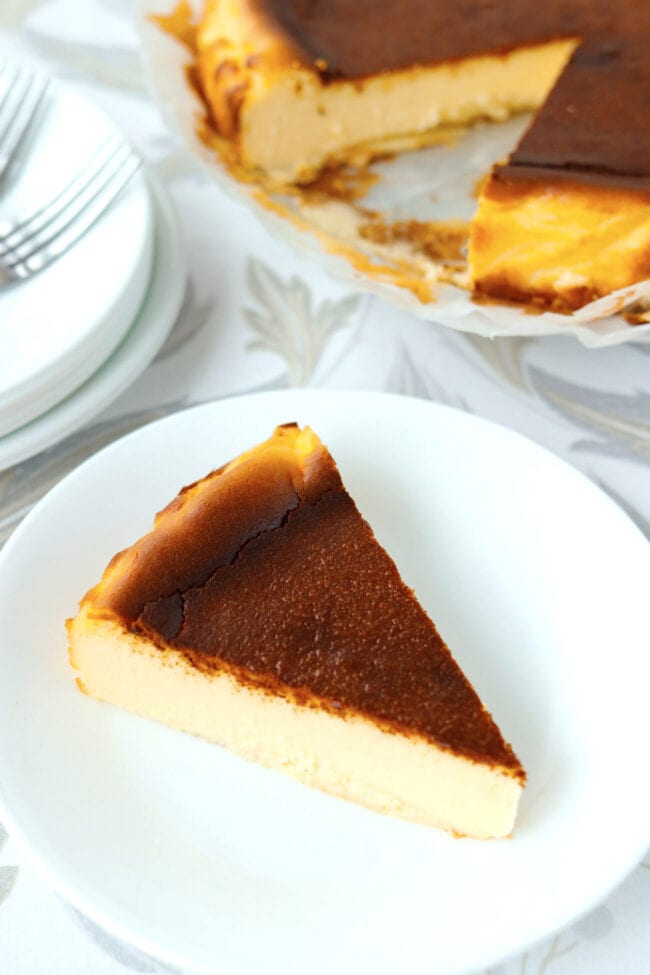
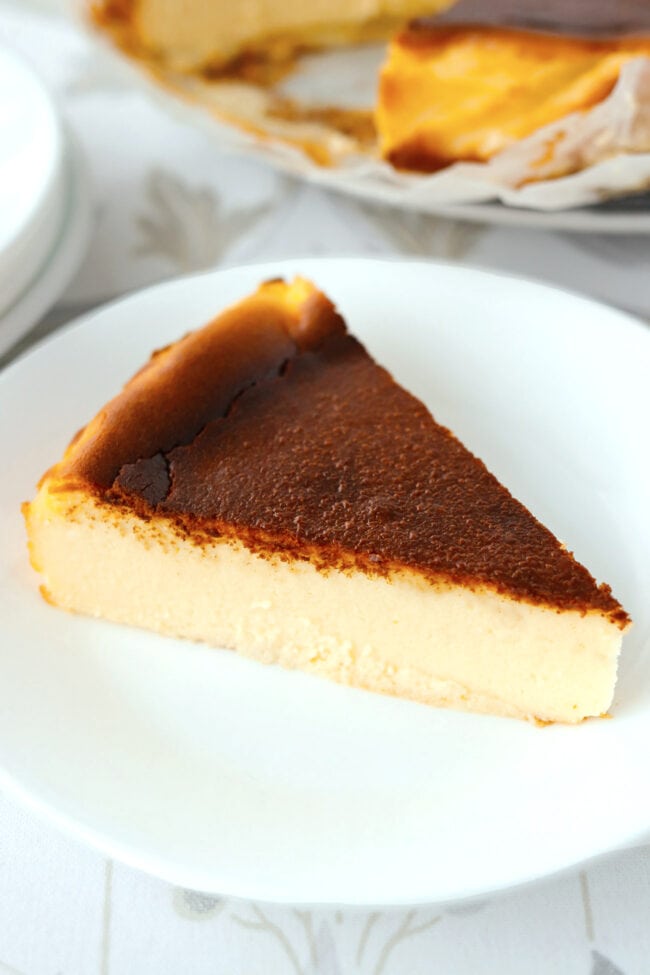
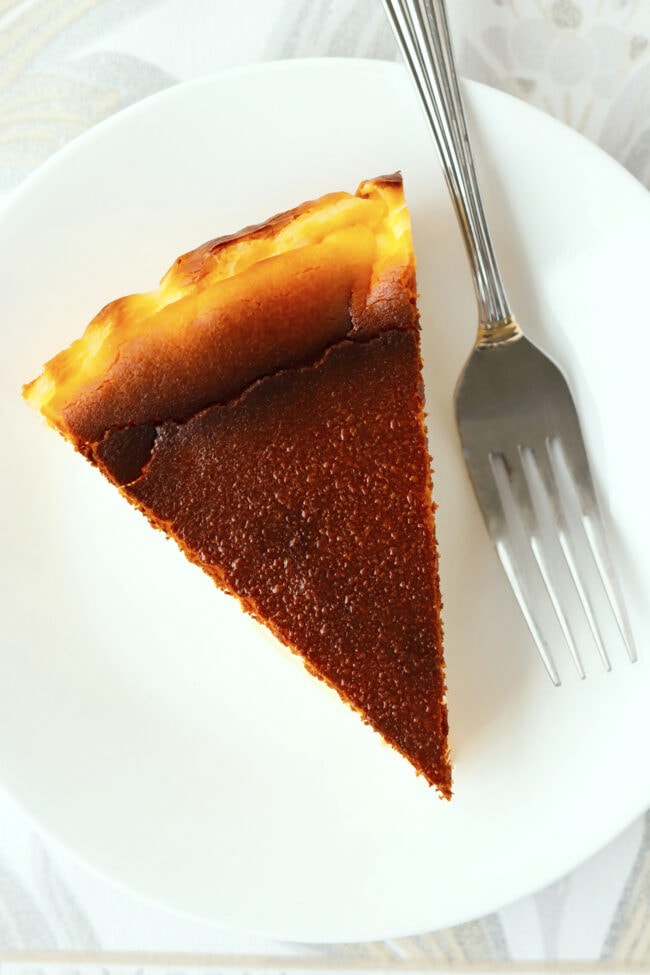
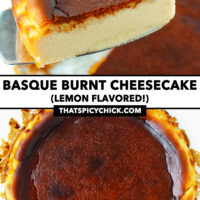
This Lemon Basque Burnt Cheesecake is incredibly easy to make, and deliciously light and creamy! It’s easier to make than most cheesecakes, and boasts irresistible bright lemony flavors and a caramelized burnt top!

As a food blogger, I’m usually meant to create recipes for what’s currently trending.
But, I’m usually the person who jumps on the bandwagon for the latest trend a few months (or years!) after everyone else. (Watch this space for a spicy twist on feta pasta and sourdough bread recipe…ONE DAY!). 😂
I’d seen Basque burnt cheesecake recipes splashing all over Instagram and Facebook throughout 2020, and back when the pandemic first started making it’s way across the world. But having never been particularly fond of cheesecake, the only thought that occurred to me was why would anyone intentionally “burn” anything, let alone a dessert that’s meant to be rich and creamy, and marvelously smooth.
A few weeks ago, I walked by a newly opened Japanese bakery in the bustling heart of Hong Kong – Central, called Homebake. I popped in to see if any delicious warm and soft freshly baked breads would tempt me. Ironically, the thing that commanded my full attention was the several miniature Basque burnt cheesecakes in the window by the cashier. The alluring smell of burnt, caramelized sugar persuaded me to take home the Original and two other flavors.
That night after indulging in the Original flavored mini Basque burnt cheesecake, I officially become a convert. I now LOVE cheesecake! Particularly, Basque burnt cheesecake. 😍 😍 After some research and experimenting, this wonderful, creamy, and absolutely luscious Lemon Basque Burnt Cheesecake recipe was born!
Why This Recipe Works
- It’s incredibly easy to make, and doesn’t require baking in a water bath.
- It takes just 15 minutes to prepare the batter. The longest and hardest part is waiting for the cake to cool before you dig in!
- It’s light and bright thanks to lemon flavorings, and full of warm, rich vanilla flavors and caramelly tones!
- Using a springform pan lined properly and high with parchment paper ensures the cake can rise and fall into wonderful ripples as it cools. The imperfection of this cake IS its perfection!
- The method for this recipe is straightforward and practically foolproof. It’s probably the easiest cheesecake you’ll ever make!
Ingredients
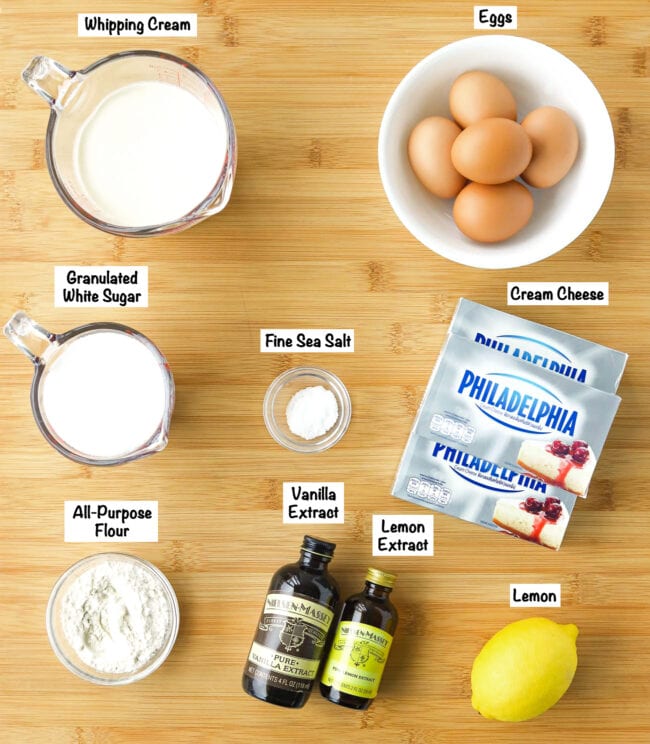
- Oil (or butter): To help the parchment paper stick to the springform pan. I used extra light tasting olive oil, but you can use vegetable oil, or butter the pan (or spray with cooking oil spray) instead.
- Cream Cheese: I use full-fat Philadelphia cream cheese and highly recommend using this brand for best flavor and texture. That said, any brand will work as long as it’s full-fat cream cheese.
- Sugar: I use granulated white sugar because that’s what I always have in my kitchen. But you’re welcome to use caster sugar (also known as superfine sugar) instead. (See notes in recipe card below if using caster sugar.)
- Eggs: I usually use Japanese eggs for baking as I love the flavor they give to baked desserts. But you can use the large eggs that you normally use/have in your kitchen.
- Whipping Cream: Also known as heavy or double cream. Make sure that it has at least a 35% fat content. I like to use French whipping cream for a more luscious and creamy texture.
- Fine Sea Salt: Use about half the amount if using iodized table salt.
- Vanilla Extract: The original recipe doesn’t call for vanilla or any other flavorings. But I love using a little vanilla in my baked desserts.
- Lemon Extract: To give the cheesecake a delicious, bright lemony flavor!
- Lemon Juice: Freshly squeezed please! It really brightens and “lifts up” the flavors in this rich cheesecake, and makes it taste lighter.
- Flour: Just regular all-purpose flour to help with the structure. I like a slightly creamy, but firm cheesecake so I use about a quarter of a cup. You can use less if you prefer your cheesecake to be creamier and softer in the center.
- To Serve (optional): You can serve the cheesecake on its own, or with a dusting of icing sugar, fresh berries or other fruit if you like.
Full ingredient list and amounts are in the recipe card below.
How to Make Lemon Basque Burnt Cheesecake
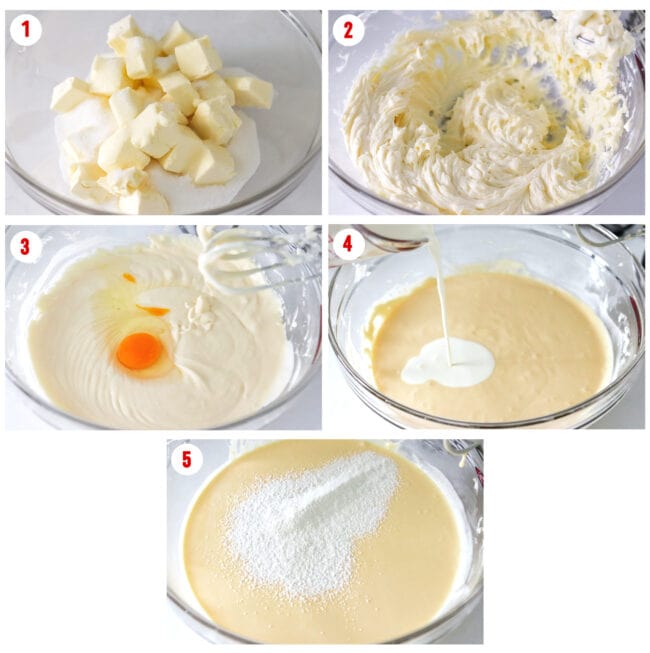
- Prep. Preheat oven to 200°C/400°F. Brush a bit of oil in a 10-inch springform pan, then line with two large sheets of parchment paper (nonstick cooking paper) in a crisscrossed fashion. Press and crease as needed to ensure that the bottom of the pan is covered, and that the parchment rises a few inches above the sides of pan. Cut the cream cheese blocks into smaller cubes (it’ll make it easier to cream) and place them and the sugar in a large mixing bowl.
- Beat the cream cheese and sugar. You can use either an electric hand mixer or a stand mixer with the paddle attachment. Beat until smooth and creamy, scraping the sides of the bowl as needed.
- Beat in eggs: One at a time, and beat until each egg is fully incorporated before adding the next.
- Add cream and flavorings: Beat until evenly combined.
- Sift in the flour: Use a fine mesh strainer to do so, and mix until no lumps remain and the batter is very smooth.
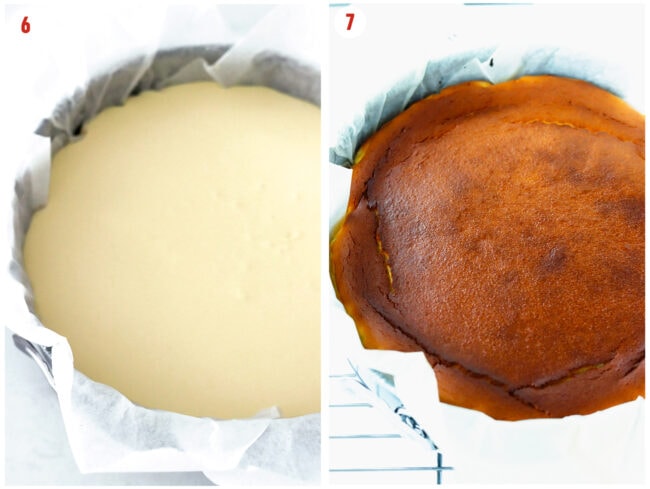
6. Bake: Pour the batter into the prepared pan and bake for 55-60 minutes, or until the top is a deep shade of golden brown and has risen, but the cake is still slightly jiggly in the center.
7. Cool: Transfer to a wire cooling rack and allow to cool completely. (It will deflate and darken a bit more as it cools, but that’s completely normal.) Once at room temperature, cover and refrigerate for an hour (or overnight if serving the next day).
8. Slice and serve! Remove from the refrigerator and unmold by taking off the sides of the pan. Carefully peel back the parchment paper. Allow to come back to room temperature, then slice, serve, and enjoy!
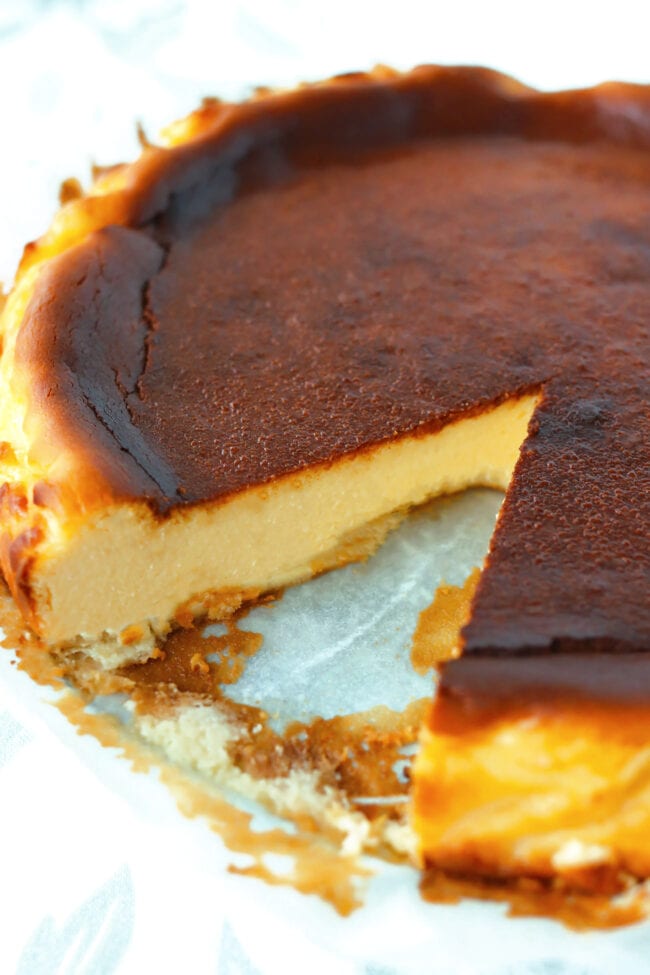
This Lemon Basque Burnt Cheesecake takes fantastic on its own with its rich and creamy filling and spectacular caramelly burnt top. But feel free to serve with a dusting of icing sugar, fresh berries or any other fruit if you like.
Full detailed instructions are in the recipe card below.
Cook’s Tips
- Line the springform pan properly with the parchment paper. Leaks are no fun to clean up, so it’s best to ensure that you’ve lined the pan properly and the bottom is completely covered. Lightly brushing oil in the pan (or buttering it) helps the paper to stick, so don’t skip this step!
- Use room temperature ingredients. It does make a difference in the texture of the cake. Be sure to take out your eggs, cream cheese, and whipping cream from the fridge 1 hour in advance before you start making the batter.
- Place the springform pan on a baking tray instead of a wire rack when baking. Just in case there’s any leakage, the baking tray will catch it and your oven floor won’t get sticky and messy.
- Don’t overbeat/mix. Beat and mix ingredients until they are just incorporated before moving onto the next one. Overbeating can result in a dryer cake due to more air bubbles and gluten forming in the batter.
- Release trapped air bubbles before baking. You can do this by gently tapping the pan on the counter to pop the air bubbles. If they are stubborn and won’t pop with gentle tapping of the pan, use a toothpick or cake tester to poke them.
FAQs
It isn’t, but it’s highly recommended in order to prevent the possibility of the cake cracking through the center when removing from a regular round pan. Also, the cake will rise better in a springform pan than in a regular round cake pan.
The cheesecake can be stored whole or sliced in sealed airtight containers in the refrigerator for up to one week. However, it’ll taste best when eaten during the first 3 days.
To freeze Basque cheesecake, slice into individual slices and place on a baking tray (leaving enough space between each slice so that they aren’t touching), and freeze until hardened. Then transfer the slices to individual sealed airtight containers and wrap the containers in foil for extra protection before freezing for up to 3 months. To thaw, set the container(s) on the counter for a few hours at room temperature before eating.
Variations
- Bake for a longer/shorter duration. Depending on how firm and “burnt” you’d like the cheesecake to be, you can bake 5 or so minutes longer than the time specified for a firmer and more burnt cheesecake, or 5 minutes less for a creamier and softer cheesecake with a less burnt top.
- Use cake flour instead of all-purpose flour. Cake flour will make the end result slightly lighter and creamier than all-purpose flour.
- Make it gluten-free. Use a gluten-free flour such a 1-to-1 gluten-free baking flour. Alternatively, you can use corn starch or rice flour.
- Leave out the lemon and flavorings. Make a classic Basque burnt cheesecake by leaving out the lemon juice, lemon extract, and vanilla extract. Or just leave out the lemon flavorings, and add 2 TSP vanilla extract for a warm toned vanilla flavored burnt cheesecake.
- Use vanilla bean. For a stronger, warm and rich vanilla flavor, split and scrape the inner seeds of a vanilla bean pod and use it instead of the vanilla extract.
- Bake in an 8-inch or 9-inch springform pan. The cake will be thicker and you’ll need to increase the baking time by 5 minutes or so.
More Cakes & Other Desserts
- Strawberry Lemon Cream Cake
- Almond Meal Banana Cake
- Banana Pecan Nut Bread (with Peanut Butter!)
- Apricot Almond Oat Slice (Oat Bars)
- Or browse the entire Desserts recipe collection.
MADE THIS RECIPE? Please leave a comment and a ⭐️⭐️⭐️⭐️⭐️ star rating below and let me know how you liked it! You can also take a photo and tag it with @thatspicychick on Instagram and hashtag it #thatspicychick. I love seeing your creations!
STAY CONNECTED! You can also follow me on Pinterest, Facebook or Instagram.
Sign up for my email list to get my latest recipe in your inbox weekly!
Lemon Burnt Basque Cheesecake

This Lemon Basque Burnt Cheesecake is incredibly easy to make, and deliciously light and creamy! It’s easier to make than most cheesecakes, and boasts irresistible bright lemony flavors and a caramelized burnt top!
- Prep Time: 15
- Cook Time: 55
- Total Time: 1 hour 10 minutes
- Yield: 12 1x
- Category: Dessert
- Method: Bake
- Cuisine: Spanish
Ingredients
- ½ TSP Extra Light Tasting Olive Oil (or use butter), for greasing pan
- 750 grams / 26.45 ounces Cream Cheese (I use full-fat Philadelphia brand cream cheese), at room temperature and softened, cut into smaller cubes
- 250 grams / 1 & ¼ cup Granulated White Sugar
- 5 Large Eggs (56–60 grams each), at room temperature
- 300ml / 1 & ¼ cup Whipping Cream (Heavy/Double Cream) – (must be at least 35% fat content)
- 1 TSP Fine Sea Salt
- 1 TSP Vanilla Extract
- 1 TSP Lemon Extract
- ½ TBLS freshly squeezed Lemon Juice
- 30 grams / ¼ cup Unbleached White All-Purpose Flour
- To Serve (optional): A dusting of icing sugar, fresh berries or other fruit
Instructions
- Prep: Preheat oven to 200°C/400°F. Lightly brush extra light tasting olive oil on the bottom and inner sides of a 10-inch springform pan. Line the pan with two large sheets of parchment paper (nonstick cooking paper) in a crisscrossed fashion. Press and crease as needed to ensure that the bottom of the pan is covered. The parchment should rise at least 2 inches above the sides of pan on all sides.
- Beat the cream cheese: Add the softened cream cheese (it helps if you cut the blocks into smaller cubes) and granulated white sugar in a large mixing bowl. Use an electric hand mixer (or a stand mixer with the paddle attachment) to beat on medium speed, stopping to scrape the sides of the bowl as needed, until smooth and creamy – about 2 minutes.
- Beat in eggs: Add the eggs, one at a time, and beat on medium-low speed until each egg is fully incorporated before adding the next one.
- Add cream and flavorings: Pour in the whipping cream, and add the salt, vanilla extract, lemon extract, and the freshly squeezed lemon juice. Continue beating on low speed until evenly combined.
- Sift in flour: Using a fine mesh strainer, sift the flour into the bowl and mix on low speed to combine, scraping the sides of the bowl as needed, until no lumps remain and the batter is very smooth.
- Bake: Pour the batter into the prepared pan. Tap the pan gently on the counter to pop any air bubbles that have formed. (You can poke them with a toothpick or cake tester if they are stubborn and won’t pop with gentle tapping.) Bake for 55-60 minutes, or until the top is a deep shade of golden brown and has risen, but the cake is still slightly jiggly in the center.
- Cool: Transfer the cake pan to a wire cooling rack and allow to cool completely – about 2-3 hours. The cake will deflate as it cools. Once at room temperature, cover and refrigerate the cake for an hour (or overnight if serving the next day).
- Slice and serve: Remove the cake from the refrigerator and unmold by taking off the sides of the pan. Carefully peel back the parchment paper, and allow the cake to come back to room temperature. Then slice, serve, and enjoy! Feel free to serve with a dusting of icing sugar, fresh berries or other fruit if desired.


Notes
- Storage: The cheesecake can be stored whole or sliced in sealed airtight containers in the refrigerator for up to one week. However, it’ll taste best when eaten during the first 3 days.
- Cheesecake flavor and refrigerating: Like most cheesecakes, this one tastes even better the next day after the flavors have had time to develop and meld. You can store it in the fridge overnight if making it a day in advance, but be careful of moisture getting into the cake. Cover the cake properly before storing in a sealed airtight container in the fridge.
- Springform pan size: You can bake in an 8-inch or 9-inch springform pan if that’s what you own. The cake will be thicker and you’ll need to increase the baking time by 5 minutes or so.
- Caster/superfine sugar option: If using caster sugar, you’ll need about 1 & 1/4 cup + 2.5 tablespoons.
- Flavoring options: You can make a classic Basque burnt cheesecake by leaving out the lemon juice, lemon extract, and vanilla extract if you wish. Or just leave out the lemon flavorings, and add 2 TSP vanilla extract for a warm toned vanilla flavored burnt cheesecake.
- See post for more tips and ideas for variations if you’d like to customize this Basque burnt cheesecake.
- Recipe adapted from Chocolates and Chai.
Nutrition
- Serving Size: 1 slice
- Calories: 383
- Sugar: 23.7g
- Sodium: 359.6mg
- Fat: 28.1g
- Saturated Fat: 16.2g
- Unsaturated Fat: 0.2g
- Trans Fat: 9g
- Carbohydrates: 26.8g
- Fiber: 0.1g
- Protein: 7.1g
- Cholesterol: 155mg
This post may contain affiliate links. We are a part of the Amazon Services LLC Associates Program, an affiliate advertising program designed to provide a means for us to earn a small commission (at no extra cost to you) by linking to Amazon.com and affiliated sites. The nutritional information provided is approximate and can vary based on several factors. It should only be used as a general guideline. For more information, please see our Disclosure.


The best Cheese cake ever. My forever favourite cake!!! Thank you so much ♥️
Hey mine turned out very eggy and firm 🙁 do you reckon I just cooked it too long?
The weird thing is it jiggled and I only baked for 50 mins
Hi Rachael,
If you’d like the cheesecake to be less firm, you can try baking it 5 minutes less next time. Keep in mind different ovens run differently so this might just be what’s needed if you plan on trying to make it again. The cake is meant to be slightly jiggly when it comes out of the oven, but it will set and firm up as it cools.
For the eggy flavor, it’s normal for basque cheesecake to have a stronger egg flavor than traditional cheesecake. The original recipe calls for even more eggs! Another option might be to try using different eggs next time – it could possibly be the batch of eggs used were more eggy tasting than usual?
I personally really like Japanese eggs in this recipe (and generally for baking and day to day use) as they have a milder flavor.
I hope this helps!
Like it says at the top of the page, incredibly easy to make, light and fluffy, lemony flavours, nice caramelized brown colour.
For someone, like myself, who is not so keen with cheesecake, this is the recipe that can change it.
Right balance and very yummy!
Thank you for sharing the recipe.
You’re most welcome Dewi. I’m so glad you enjoyed this cheesecake!
This is the best cheesecake ever ❤️🔥
Aww thank you!! So glad you enjoyed it!! 🙂
Hi Lavina, this recipe looks delicious and an planing on making it over the next few days. However can we use a biscuit base for this burnt basque cheesecake recipe?
Hi Mina! I haven’t tested this recipe using a biscuit base, but I think it could work even if it’s not traditional for burnt cheesecakes to have a crust/base. I think you could get away with not baking the base beforehand, and just add the batter to it (make sure it’s pressed down well and there are no holes). Then bake at the temperature and for the time duration specified in the recipe. Let us know how it works for you if you do decide to make this with a base! Happy baking! 🙂
I love this cake! The burnt top was the perfect touch and the lemon flavour worked so well! The cake was incredibly creamy too. Would definitely make it again! Thanks Lavina!
So glad you enjoyed this cheesecake! Thanks for coming back to leave a comment and rating. 🙂
Not only was this very easy to make, it was also deliciously rich and creamy. The burnt top came out perfect and we absolutely loved the lemon flavour in this cheesecake!! Hoping to make this for my friends soon. Thanks. 🙏
So glad you enjoyed this burnt cheesecake, Harsh! It’s one of my favorite desserts, and I’m happy that you loved the lemon flavor in it too. 🙂