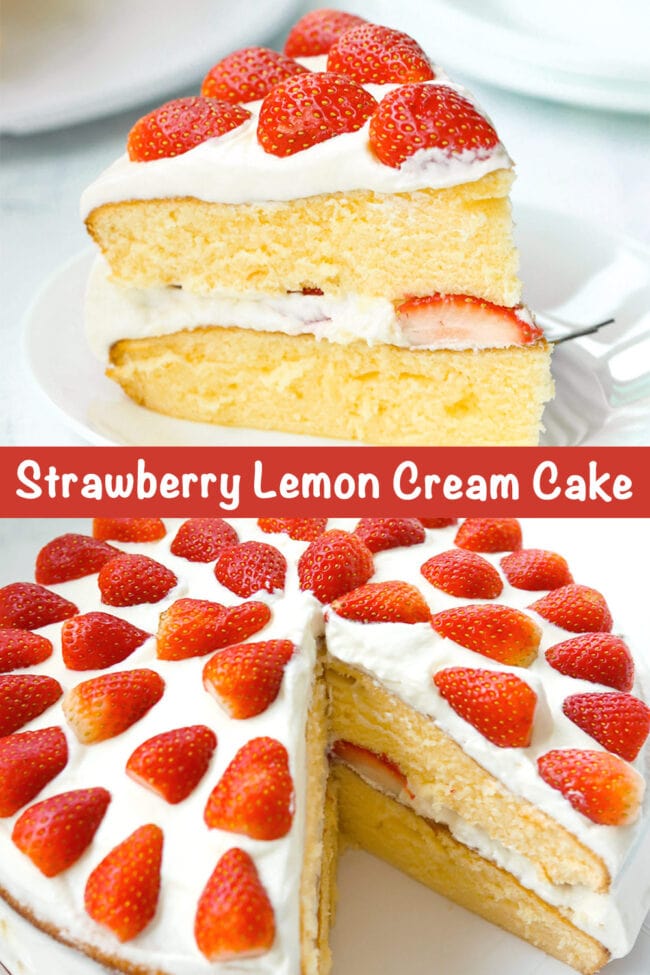
Strawberry Lemon Cream Cake
This post contains affiliate links.
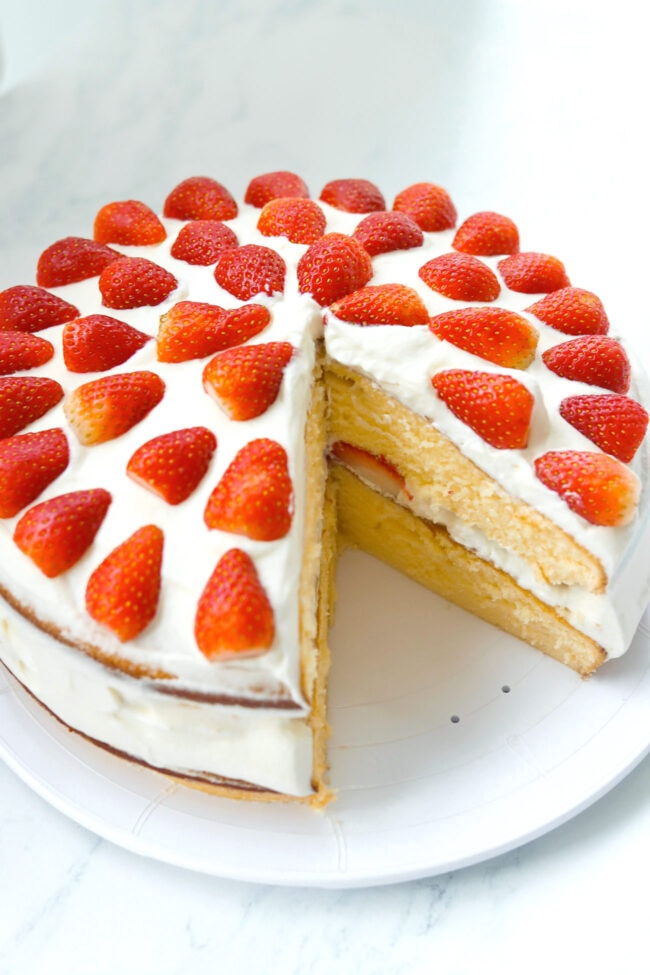
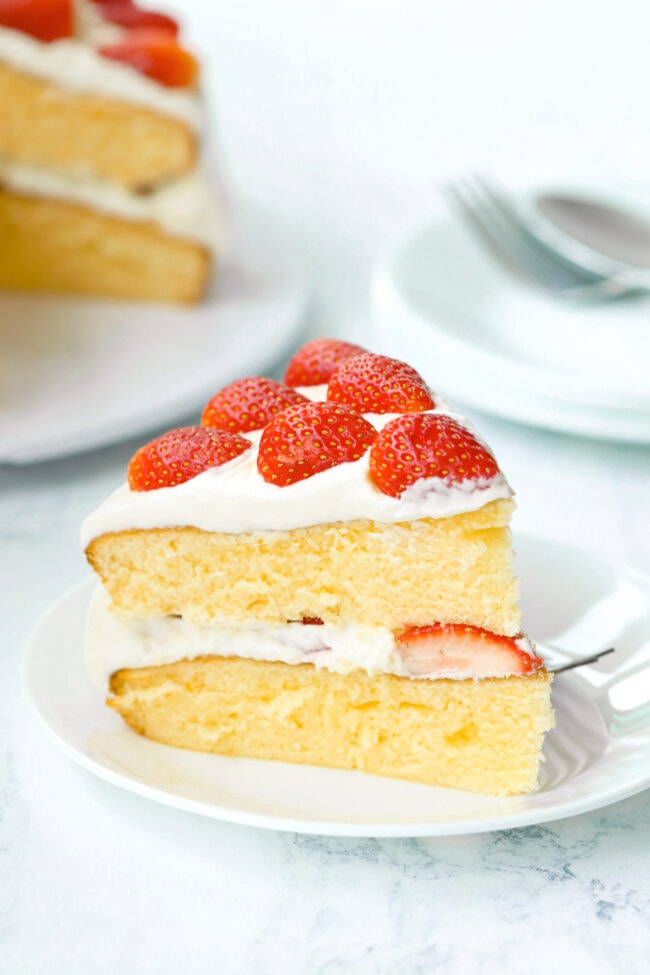
This Strawberry Lemon Cream Cake is bursting with bright summer flavors, refreshing, and absolutely delicious! Layers of lemon sponge cake, lemon curd, luscious whipped cream, and juicy and fresh sweet strawberries are sure to please any crowd!

It’s strawberry season ya’ll! 🍓
And I have a tasty summery dessert cake for you today – this Strawberry Lemon Cream Cake! This delightful cake is sweet (but not overly sweet), perfectly dense and moist, and yet kind of light thanks to soft and fluffy homemade whipped cream.
It’s full of bright lemony flavors with lemon extract and freshly squeezed lemon juice in the cake. We’ve also got a smooth, jammy, and sweet and tart layer of store-bought lemon curd in between of the whipped cream and strawberry layers!
And of course, we have juicy, ripe and fresh sweet strawberries! This tasty fruit is hard to say no to during strawberry season. But when you add cake and whipped cream to the mix, there’s nothing else I can think of that’s more wonderful on a hot summer day. 💛

Why This Recipe Works:
- The sponge cakes have a hint of lemon, and the strawberry and lemon combo with soft whipped cream makes this a refreshing dessert during the summer season.
- Homemade whipped cream is tastier and gives you the flexibility to sweeten it as much or as little as you like. It’s also a million times better in texture than a tub of cool whip. Also, it’s not as intimidating or difficult to make.
- The sponge cakes are dense thanks to unsalted butter and whole milk. This gives them the ability to hold up the weight of the strawberries and cream.
- It’s straightforward to make. Make the cake, make whipped cream while the cake is baking, prepare the strawberries, then assemble the cake. The only part that takes a little patience and time is allowing the cakes to fully cool before assembling it.
- It can be made ahead. You can make the sponge cakes a few days ahead and assemble the cake on the day of serving.

Ingredients
Here’s what you’ll need and some notes on the ingredients for this cake:
- Olive Oil: For greasing the baking pans.
- 4 large Eggs: Each egg should be roughly 57-60 grams and be at room temperature.
- Granulated White Sugar
- Cake Flour: I used Japanese Cake Flour. Regular cake flour works as well. If you don’t have cake flour on hand, you can easily make some. Simply measure out two cups of all-purpose flour, then remove four tablespoons of it and replace with four tablespoons of corn starch.
- Baking Powder: To help the cakes rise.
- Fine Sea Salt: Just a pinch to balance out the sweetness.
- Whole Milk: This cake has a slightly dense texture due to the milk (and butter). You can use low-fat milk if you prefer, but I do not recommend using non-fat milk.
- Unsalted Butter: Softened and cut into smaller chunks for easier melting.
- Vanilla Extract: For the cake and also for the whipped cream.
- Lemon Extract: This gives the sponge cake a delightful lemony essence.
- Lemon Juice: As always, I recommend using freshly squeezed lemon juice for best flavor. Pro-tip: Roll the lemons around on the counter while pressing them down gently with your hand to help them release their juices before slicing and squeezing. You’ll get more juice out of a lemon by doing this.
- Icing Sugar: Also known as confectioner’s sugar or powdered sugar.
- Whipping Cream: It should have at least a 35% fat content. You could also use heavy/double cream.
- Fresh Strawberries: I don’t recommend using frozen strawberries for this cake. The juices will cause the frosting to become watery. In addition, the cake won’t taste as great as when using fresh strawberries.
- Lemon Curd: I used store-bought lemon curd that comes in a jar. You can find this in the jam and spreads section of your local supermarket or large grocery store. But if you prefer to use or happen to have homemade lemon curd on hand, go for it!
How To Make Strawberry Lemon Cream Cake – Step-by-step

For the Lemon Sponge Cake:
- Pre-heat oven to 350°F/175°C. Grease two 9-inch round baking pans (or two 8-inch round baking pans) and line the bottom with parchment paper (nonstick cooking paper). Set them aside.
- Crack the eggs into a large mixing bowl. Beat with an electric hand mixer (or use a stand mixer) until foamy – about 3-5 minutes.
- Gradually start adding the sugar while continuing to beat for 5-7 minutes, or until the mixture is light in color, thick, and forms a ribbon like pattern in the bowl when you pull out the metal beaters attached to the electric hand mixer.
- Combine all the dry ingredients – the cake flour, baking powder, and fine sea salt in a medium sized bowl. Whisk until everything is evenly incorporated. Then sift the flour mixture using a fine mesh strainer into the bowl with the batter. Mix on low speed to combine, scraping the sides of the bowl with a rubber spatula periodically to make sure everything gets incorporated, until there are no longer lumps of flour visible and the batter is smooth.
- Combine the whole milk and unsalted butter in a microwave safe measuring cup or bowl. Heat in the microwave in 30 second bursts, mixing with a spoon in between, until the butter has fully melted and the milk is hot. Add the milk and butter mixture to the bowl with the batter, along with the vanilla extract, lemon extract, and freshly squeezed lemon juice. Mix with the rubber spatula until everything is evenly combined.
- Divide the batter into the prepared baking pans. Firmly tap the pans on the counter a few times to release any air bubbles that may have formed. Place in the oven and bake for 22-25 minutes at 350°F/175°C. Then reduce the temperature to 325°F/165°C and bake for a further 5 minutes. The cakes will be done when they are lightly brown at the top and spring back immediately when gently touched. You can also use a toothpick to check doneness by inserting it into the center of the cake. It should come out clean or with just a few crumbs attached. (Note: If your oven isn’t wide enough to fit two cake pans on the same rack, you can bake one after the first one is done.)
- Transfer the cake pans to cooling racks and allow to rest for 10 minutes. The cakes will start to pull away from the edges of the pans. Run a thin bladed knife around the edges of the pans to loosen the cakes, then invert onto the cooling rack(s). Remove and discard the parchment paper, then carefully set the cakes upright and allow to cool completely (or for at least one hour) before assembling.


For the Whipped Cream Frosting:
- While the cakes are baking, make the whipped cream frosting. Add the whipping cream to a medium sized mixing bowl and beat on medium-high speed with an electric hand mixer (or you can use a stand mixer or beat by hand using a whisk). It will become foamy at first.
- Once it starts to thicken, add the icing sugar and vanilla extract and continue beating until medium peaks form. Refrigerate until ready to use. (Note: You may need to beat again just before using as refrigerating may alter the texture and slightly loosen up the whipped cream.)

To Assemble the Cake:
- Hull the strawberries then give them a good rinse. Pat-dry with paper towels, then cut them in half and set aside.
- Place one layer of cake on a revolving cake stand or serving platter and make sure it is centered. Then spread about three tablespoons of lemon curd evenly on top using a small flat spatula.
- Next, spread about a cup of the whipped cream evenly on top using a large flat spatula. Line strawberry halves in a ring pattern, stem side facing outward, around the perimeter of the whipped cream layer. Continue lining up the strawberry halves in the same fashion until you reach the center of the cake.
- Spread about another cup of whipped cream on top of the strawberries layer. Then carefully place the second cake layer on top and gently press down.
- Repeat the whipped cream layer on top of the second cake layer and spread evenly on top and around the sides to cover the cake. Turn the cake stand and use the flat side of the large spatula (or an offset spatula or a cake scraper) to smooth out the whipped cream and remove any excess cream around the edges. Then top with a final strawberries layer, lining them up in the same fashion as the first strawberries layer. Use a wet paper towel to wipe up any crumbs or excess cream around the bottom of the cake for better presentation.
- Refrigerate for 10 minutes to allow the frosting to set (this will make it easier to cut into slices).
- Then slice, serve, and enjoy!
Cook’s Tips
- What to do if your eggs aren’t at room temperature. Place them in a bowl of lukewarm water for 15 minutes to bring them up to room temperature.
- Don’t skip sifting the dry ingredients. This is a very important step as it will determine the overall texture of the cake. Sifting the combined dry ingredients before adding them to the batter ensures that they will be combined evenly and well distributed. It’ll also make it easier to mix with the other ingredients and prevent you from ending up with a lumpy batter.
- Don’t allow any outdoor drafts to get in. Outdoor drafts can make freshly baked warm cakes taste eggy if they hit it. Make sure your windows are closed while the cakes are cooling.
- Allow the cakes to cool completely before frosting. If your cakes are still warm and you attempt to frost the cakes, the frosting will slide off the sides and weep! So make sure the cakes are completely cool before you apply the frosting and strawberry layers.
- Avoid touching the cake directly with your spatula while frosting. This will prevent your whipped cream from getting crumbs into it and spreading them all over the cake as you frost. Try to only touch the whipped cream with your spatula as you cover the cake in the frosting.
- Chill the mixing bowl and metal beaters of the electric hand mixer before making the whipped cream. Stick them in the fridge (or freezer) for 20 minutes to make sure they are nice and cold before you start beating the whipping cream. Also, make sure that your whipping cream is as cold as possible and take it out of the fridge just when you’re ready to make the whipped cream.
- Don’t overbeat the whipping cream. This is very easy to do. The whipping cream can go from thickened cream to grainy butter in just a matter of seconds. Once you see medium peaks form (the peaks will hold their shape well but the tip will curl over itself when you pull out the beaters), stop beating.
- Cool the cakes in the fridge before frosting. If you chill the cakes in the refrigerator for even just 15 minutes, there will be less crumbs when you apply the frosting.
- Apply a crumb coat. A crumb coat is a thin layer of frosting that is applied on top and around the cake. Then the cakes are refrigerated for 10-15 minutes to allow the frosting to set. This will make it easier to apply the final thick coat of frosting without having crumbs spread all around the cake. You can apply the crumb coat right after applying the second layer of frosting on top and around the sides of the cake layers. Refrigerate for 10-15 minutes. Then take the cake out from the fridge and apply the final whipped cream and strawberry layers.

FAQs
This Strawberry Lemon Cream Cake tastes best on the day of making and assembling the layers. However, you can refrigerate any leftover slices in sealed airtight containers for up to 3-4 days. Keep in mind there’s fresh fruit in the cake, so it’s best consumed sooner than later.
You may have some extra leftover whipped cream after frosting the cake. You can freeze it in a freezer safe sealed container for up to 2-3 months to use at a later date. Or if storing in the refrigerator, it will stay good for 2-3 days. You can enjoy any leftover whipped cream by adding a dollop to your morning coffee, topping your pancakes or waffles with it for breakfast, or dipping fresh berries in it.
Cakes with whipped cream taste great cold or at room temperature. If refrigerating any leftover slices in sealed airtight containers, I suggest removing them from the fridge and letting them sit on the counter for anywhere between 5-20 minutes before serving.
Yes. You can bake the sponge cakes 4-5 days in advance. Wrap them (individually) tightly in cling wrap after they have cooled for at least an hour on a cooling rack. Then refrigerate and assemble the frosting and strawberry layers on the day of serving.
Yes. If you’d like to freeze the cakes and frost them at a later date, wrap each cake individually and tightly in cling wrap. Then wrap again in foil and freeze for up to three months. Thaw on the counter for 2-3 hours before assembling.
I haven’t yet tried making this cake gluten-free. But I would suggest using a gluten-free flour such as Bob’s Red Mill 1-to-1 Gluten-Free Baking Flour instead of the cake flour. Also, be sure to check that your vanilla and lemon extracts are gluten-free certified.
I haven’t tried making this cake dairy-free. But I would recommend using a dairy-free milk such as almond, coconut, or oat milk in place of the whole milk. Also, use a vegan unsalted butter and make a vegan whipped cream with coconut milk. Note that these adjustments will alter the flavor profile of the cake.
Check out The Spruce Eats’ vegan whipped cream recipe if you would like to make this cake dairy-free.
VARIATIONS
If you’d like to customize this cake, you can…
- Add nuts: Add sliced almonds, hazelnuts, macadamia nuts or any other nuts you like to the batter before baking. You can also top the cake with some finely chopped nuts around the perimeter or in the center along with the strawberries.
- Use oil: Instead of butter, you can use canola or vegetable oil to make a lighter and airier cake. The butter makes the cake denser, but it really does add something special to the taste. This is why I prefer to use all butter for this cake. But if you wish, you can compromise and use half butter and half oil instead. This way, you’ll get some of the buttery flavor goodness and fluffier texture in the cake.
- Use different berries: You can use any berries you happen to have on hand or like instead of strawberries. Raspberries, blueberries, blackberries all would work great!
- Use a different curd: You can use other bright flavored curds instead of lemon curd. Passionfruit, mango, orange, rhubarb, raspberry curd, etc. would all work great!
- Change up the whipped cream flavor: Feel free to add any extra sweeteners or extracts to the whipped cream. I like the simple vanilla flavor and use less icing sugar than most recipes call for. But you can add lemon or almond extract, and more sugar if you’d like to take up the flavor profile of the whipped cream a notch!
More Delicious Desserts and Sweet Treats
- Almond Meal Banana Cake
- Banana Pecan Nut Bread (with Peanut Butter!)
- Apricot Almond Oat Slice (Oat Bars)
- Chocolate & Butterscotch Chip Cookie Cake
- Nutella & Peanut Butter Energy Balls
- Dark and White Chocolate Bark with Mixed Fruits & Nuts
- Or feel free to browse the entire Desserts recipe collection.
MADE THIS RECIPE? Please leave a comment and a ⭐️⭐️⭐️⭐️⭐️ star rating below and let me know how you liked it! You can also take a photo and tag it with @thatspicychick on Instagram and hashtag it #thatspicychick. I love seeing your creations!
STAY CONNECTED! You can also follow me on Pinterest, Facebook or Instagram.
Sign up for my email list to get my latest recipe in your inbox weekly!
Strawberry Lemon Cream Cake

This Strawberry Lemon Cream Cake is bursting with bright summer flavors, refreshing, and absolutely delicious! Layers of lemon sponge cake, lemon curd, luscious whipped cream, and juicy and fresh sweet strawberries are sure to please any crowd!
- Prep Time: 120
- Cook Time: 30
- Total Time: 2 hours 30 minutes
- Yield: 10 1x
- Category: Desserts
- Method: Beat, Mix, Bake
- Cuisine: Japanese, American
Ingredients
For the Lemon Sponge Cake:
- Olive Oil, for greasing baking pans
- 4 large Eggs (57–60 grams each), at room temperature
- 1.5 cups granulated White Sugar
- 2 cups Cake Flour (I used Japanese Cake Flour. See notes if you don’t have cake flour on hand.* )
- 2 TSP Baking Powder
- ¼ TSP Fine Sea Salt
- 1 cup Whole Milk
- 100 grams (1/2 cup) Unsalted Butter, softened – cut into smaller chunks for easier melting
- 1 TSP Vanilla Extract
- 1 TSP Lemon Extract
- 1.5 TBLS freshly squeezed Lemon Juice
For the Whipped Cream Frosting:
- 2.5 TBLS Icing Sugar (also known as confectioner’s sugar)
- 1 TSP Vanilla Extract
- 400ml (about 1.70 cups) Whipping Cream (it should have at least a 35% fat content. You could also use heavy/double cream.)
To Assemble the Cake:
- 2.75 cups (about 345 grams/44 pieces) medium-sized fresh Strawberries – washed and dried, then hulled and halved
- 3 TBLS Lemon Curd (I used store-bought, but you could use homemade if you prefer)
- Whipped Cream Frosting
Instructions
For the Lemon Sponge Cakes:
- Pre-heat oven to 350°F/175°C. Grease two 9-inch round baking pans (or two 8-inch round baking pans) and line the bottom with parchment paper (nonstick cooking paper) and set them aside.
- Crack the eggs into a large mixing bowl. Beat with an electric hand mixer (or use a stand mixer) until foamy – about 3-5 minutes.
- Gradually start adding the sugar while continuing to beat for 5-7 minutes, or until the mixture is light in color, thick, and forms a ribbon like pattern in the bowl when you pull out the metal beaters attached to the electric hand mixer.
- Combine all the dry ingredients – the cake flour, baking powder, and fine sea salt in a medium sized bowl. Whisk until everything is evenly incorporated. Then sift the flour mixture using a fine mesh strainer into the bowl with the batter. Mix on low speed to combine, scraping the sides of the bowl with a rubber spatula periodically to make sure everything gets incorporated, until there are no longer lumps of flour visible and the batter is smooth.
- Combine the whole milk and unsalted butter in a microwave safe measuring cup or bowl. Heat in the microwave in 30 second bursts, mixing with a spoon in between, until the butter has fully melted and the milk is hot. Add the milk and butter mixture to the bowl with the batter, along with the vanilla extract, lemon extract, and freshly squeezed lemon juice. Mix with the rubber spatula until everything is evenly combined.
- Divide the batter into the prepared baking pans. Firmly tap the pans on the counter a few times to release any air bubbles that may have formed. Place in the oven and bake for 22-25 minutes at 350°F/175°C. Then reduce the temperature to 325°F/165°C and bake for a further 5 minutes. The cakes will be done when they are lightly brown at the top and spring back immediately when gently touched. You can also use a toothpick to check doneness by inserting it into the center of the cake. It should come out clean or with just a few crumbs attached. (Note: If your oven isn’t wide enough to fit two cake pans on the same rack, you can bake one after the first one is done.)
- Transfer the cake pans to cooling racks and allow to rest for 10 minutes. The cakes will start to pull away from the edges of the pans. Run a thin bladed knife around the edges of the pans to loosen the cakes, then invert onto the cooling rack(s). Remove and discard the parchment paper, then carefully set the cakes upright and allow to cool completely (or for at least one hour) before assembling.
For the Whipped Cream Frosting:
- While the cakes are baking, make the whipped cream frosting. Add the whipping cream to a medium sized mixing bowl and beat on medium-high speed with an electric hand mixer (or you can use a stand mixer or beat by hand using a whisk). It will become foamy at first.
- Once it starts to thicken, add the icing sugar and vanilla extract and continue beating until medium peaks form. Refrigerate until ready to use. (Note: You may need to beat again just before using as refrigerating may alter the texture and slightly loosen up the whipped cream.
To Assemble the Cake:
- Hull the strawberries then give them a good rinse. Pat-dry with paper towels, then cut them in half and set aside.
- Place one layer of cake on a revolving cake stand or serving platter and make sure it is centered. Then spread about three tablespoons of lemon curd evenly on top using a small flat spatula.
- Next, spread about a cup of the whipped cream evenly on top using a large flat spatula. Line strawberry halves in a ring pattern, stem side facing outward, around the perimeter of the whipped cream layer. Continue lining up the strawberry halves in the same fashion until you reach the center of the cake.
- Spread about another cup of whipped cream on top of the strawberries layer. Then carefully place the second cake layer on top and gently press down.
- Repeat the whipped cream layer on top of the second cake layer and spread evenly on top and around the sides to cover the cake. Turn the cake stand and use the flat side of the large spatula (or an offset spatula or a cake scraper) to smooth out the whipped cream and remove any excess cream around the edges. Then top with a final strawberries layer, lining them up in the same fashion as the first strawberries layer. Use a wet paper towel to wipe up any crumbs or excess cream around the bottom of the cake for better presentation.
- Refrigerate for 10 minutes to allow the frosting to set (this will make it easier to cut into slices).
- Then slice, serve, and enjoy!


Notes
Cook’s Tips and FAQs:
- To make cake flour: If you don’t have cake flour on hand, you can easily make some. Simply measure out two cups of all-purpose flour, then remove four tablespoons of it and replace with four tablespoons of corn starch.
- Don’t allow any outdoor drafts to get in. Outdoor drafts can make freshly baked warm cakes taste eggy if they hit it. Make sure your windows are closed while the cakes are cooling.
- Chill the mixing bowl and metal beaters of the electric hand mixer before making the whipped cream. Stick them in the fridge (or freezer) for 20 minutes to make sure they are nice and cold before you start beating the whipping cream. Also, make sure that your whipping cream is as cold as possible and take it out of the fridge just when you’re ready to make the whipped cream.
- Tips for frosting the cakes: 1. Allow the cakes to cool completely before frosting. If your cakes are still warm and you attempt to frost the cakes, the frosting will slide off the sides and weep! You can chill the cakes in the refrigerator to speed up the cooling process. 2. Avoid touching the cake directly with a spatula while frosting. This will prevent your whipped cream from getting crumbs into it and spreading them all over the cake as you frost. 3. Apply a crumb coat. A crumb coat is a thin layer of frosting that is applied on top and around the cake. Then the cakes are refrigerated for 10-15 minutes to allow the frosting to set. This will make it easier to apply the final thick coat of frosting without having crumbs spread all around the cake. You can apply the crumb coat right after applying the second layer of frosting on top and around the sides of the cake layers. Refrigerate for 10-15 minutes. Then take the cake out from the fridge and apply the final whipped cream and strawberry layers.
- Storing leftover cake slices: This cake tastes best on the day of making and assembling the layers. However, you can refrigerate any leftover slices in sealed airtight containers for 3-4 days. Keep in mind there’s fresh fruit in the cake, so it’s best consumed sooner than later.
- Leftover whipped cream: If you have some extra leftover whipped cream, you can freeze it in a freezer safe sealed container for up to 2-3 months. Alternatively, store in the refrigerator for 2-3 days. You can enjoy any leftover whipped cream by adding a dollop to your morning coffee, topping your pancakes or waffles with it for breakfast, or dipping fresh berries in it.
- Best temperature for serving: Cakes with whipped cream taste great cold or at room temperature. If refrigerating any leftover slices in sealed airtight containers, I suggest removing them from the fridge and letting them sit on the counter for anywhere between 5-20 minutes before serving.
- Make ahead: You can bake the sponge cakes 4-5 days in advance. Wrap them (individually) tightly in cling wrap after they have cooled for at least an hour on a cooling rack. Then refrigerate and assemble the frosting and strawberry layers on the day of serving.
- Freezing the sponge cakes: If you’d like to freeze the cakes and frost them at a later date, wrap each cake individually and tightly in cling wrap. Then wrap again in aluminum foil and freeze for up to three months. Thaw on the counter for 2-3 hours before assembling.
Nutrition
- Serving Size: 1 slice
- Calories: 444
- Sugar: 38.6g
- Sodium: 109.8mg
- Fat: 18.8g
- Saturated Fat: 10.8g
- Unsaturated Fat: 6.4g
- Trans Fat: 0.3g
- Carbohydrates: 62.9g
- Fiber: 1.2g
- Protein: 6.4g
- Cholesterol: 121.3mg
This post may contain affiliate links. We are a part of the Amazon Services LLC Associates Program, an affiliate advertising program designed to provide a means for us to earn a small commission (at no extra cost to you) by linking to Amazon.com and affiliated sites. The nutritional information provided is approximate and can vary based on several factors. It should only be used as a general guideline. For more information, please see our Disclosure.


Yum!