Kimchi Fried Rice with Pork Belly
This post contains affiliate links.
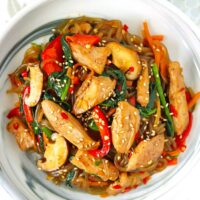
This Kimchi Fried Rice with Pork Belly is an easy to make one wok Korean fried rice that is full of BIG and BOLD flavors! It’s made with thinly sliced pork belly meat, kimchi, fragrant aromatics, a few veggies, and the most delicious gochujang infused spicy, smoky, and tangy sauce with a hint of sweetness! It’s ready in under 30 minutes and perfect for busy weeknights!

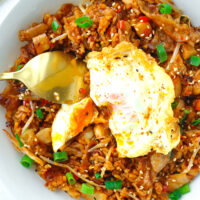
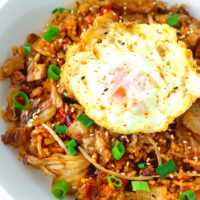
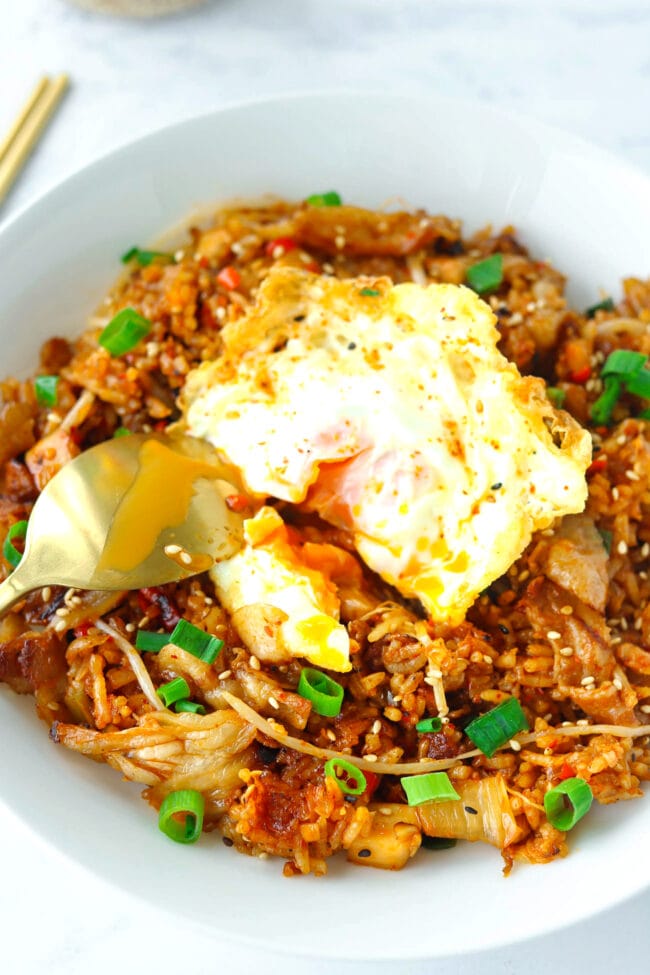
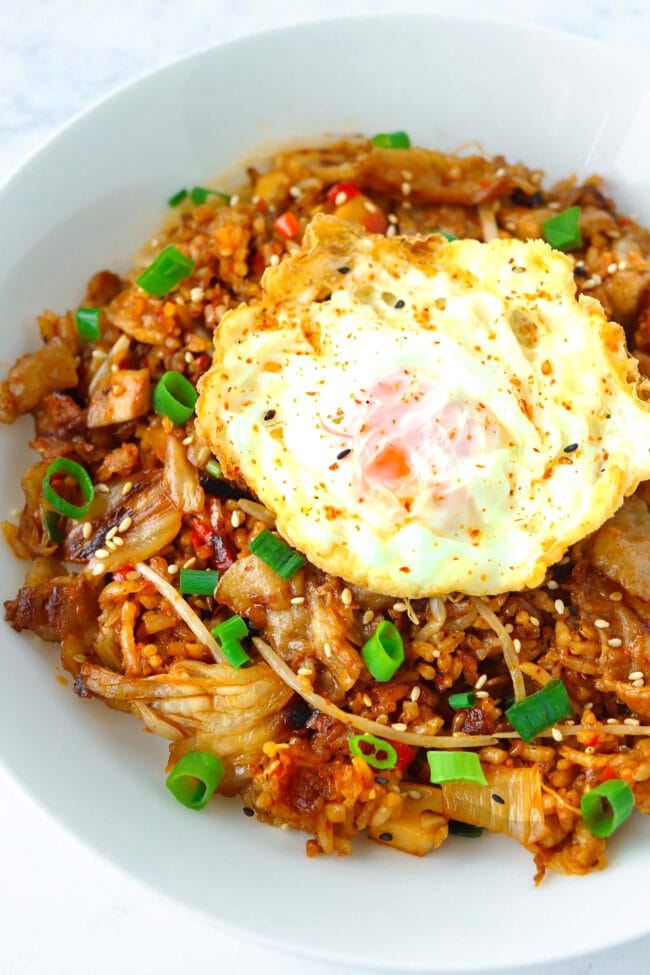
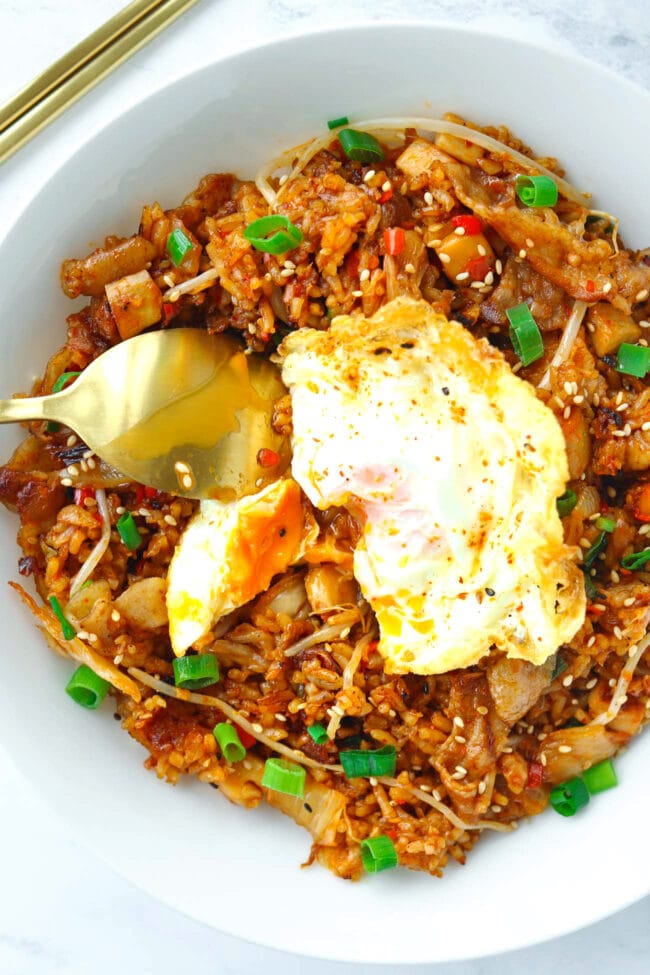
Kimchi fried rice (kimchi bokkeumbap) with seared thinly sliced tender pork belly meat, plenty of garlic, diced meaty king oyster mushrooms, tangy cabbage kimchi, a savory-spicy and smoky sauce with a hint of sweetness, crisp mung bean sprouts and spring onion…AND a crispy fried egg! 🤤
Friends, this is my idea of the perfect weeknight meal! It’s easy to make in one wok (or a deep heavy bottomed frying pan) in a matter of minutes, and all the flavors just sing together. It’s so darn delicious that I think you’ll find it hard to not go in for a second helping!
This humble Korean fried rice is a satisfying meal on its own just like my stir-fried kimchi chicken noodles. It also pairs well with Korean food like a spicy Korean pork stir-fry or other Asian main dishes.
Why This Recipe Works
- It’s great for using up leftover rice, ready in under 30 minutes, and perfect for busy weeknights!
- Fragrant aromatics like garlic, ginger and fresh red chilies add plenty of flavor, while gochujang and kimchi add umami notes to this fried rice.
- The heat level is easily customizable and you can make it as mild or spicy as you like!
- Cooking over high heat, as well as allowing the fried rice to sit for a few seconds then tossing again instead of constantly stir-frying prevents it from becoming mushy and soggy.
- You can enjoy it as a meal on its own, or with other Korean or Asian main dishes.
Ingredient Notes

- Gochujang: A fermented Korean chili pepper paste that comes in small tubs. In spite of its deep dark red color, it’s not extremely spicy. It has a spicy-sweet and smoky flavor profile instead. Look for it in the Asian aisle of supermarkets or in Asian and Korean supermarkets.
- Gochugaru: A Korean hot pepper powder. Find it in a Korean grocery store or buy it online. Note that some may be very spicy depending on the brand, so adjust the quantity to taste. If unavailable, use chili powder.
- Chili Oil: A pure chili oil without any seeds or flakes for extra heat. Omit if making this dish mild.

- Pork: I’ve used thinly sliced pork belly (hotpot/shabu shabu style meat). You can find it in packages at Asian supermarkets and Japanese groceries stores. I’ve cut the pieces into strips and marinated them with low sodium light soy sauce, gochujang, a splash of Korean sake (cooking wine), sesame oil, and freshly cracked black pepper. The sake brings out the flavor in the meat and also helps to tenderize it. However, you can leave it out if you rather not cook with alcohol.
- Fresh Red Chilies: I used plenty of fresh Thai Bird’s Eye red chilies to make this fried rice wonderfully spicy! But feel free to use less or omit to make it milder if you prefer.
- Veggies: I went with onion, king oyster mushroom, and mung bean sprouts. Feel free to swap out the mushrooms and mung bean sprouts for other fried rice friendly veggies.
- Kimchi: A Korean spicy fermented cabbage that comes in either jars, cans, or packages. It’s usually made with cabbage, radish, sometimes carrots, as well as plenty of other seasonings such as fish sauce, gochugaru, garlic, and ginger. Look for it in the fridge section of some large supermarkets that are well-stocked with international ingredients or in Asian and Korean supermarkets. Depending on the brand and how old the kimchi is, the degree of sourness will vary.
- Kimchi Juice: The liquid in the bottom of the package/jar of kimchi, which has plenty of flavor! Although it’s a key ingredient in making kimchi fried rice, your jar may not always have a lot of kimchi juice. This is why I’ve also used distilled white vinegar in the fried rice sauce to deliver more tangy flavors.
- Long Grain Rice: Day-old cooked cold long grain rice like Thai jasmine rice works best for making fried rice.
- Canola Oil: Or use any other neutral flavored oil with a high smoke point (i.e: vegetable or peanut oil) for cooking.
- To Serve: Drizzle of sesame oil, chopped spring onion (scallion) and toasted white sesame seeds for garnish. Also a fried egg sprinkled with shichimi togarashi (Japanese assorted chili pepper) – one for each serving.
Full ingredient list and amounts are in the recipe card below.

How to Make Kimchi Fried Rice with Pork Belly
1. Fry the eggs. One at time and in a large wok. I like to spoon the hot oil over the eggs as it cooks, just like you would when making a Thai style fried egg. Once your desired doneness for the yolk is reached, transfer to a paper towel lined plate and set aside.
2. Sauté onions and aromatics. Sauté the yellow onion and spring onion white and light green parts until translucent. Then add the garlic, ginger, and red chilies and stir-fry for 30 seconds until fragrant.
3. Cook the pork. Push everything to the edges of the wok to make a well. Add the pork and let it sear for a minute before flipping to sear the other side. Then stir-fry to combine with everything.
4. Cook the mushrooms. Add the chopped king oyster mushrooms and stir-fry with everything until slightly softened.
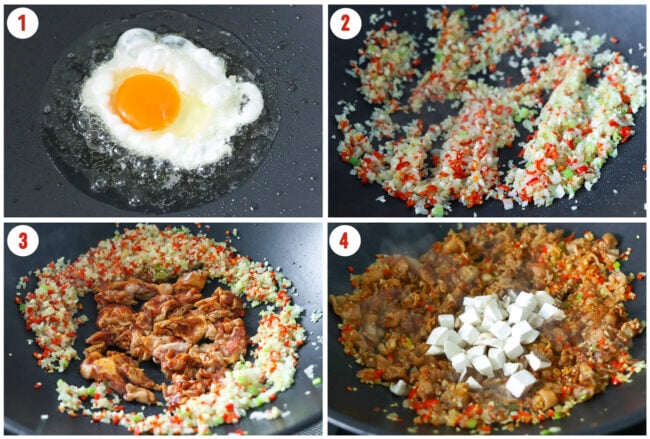
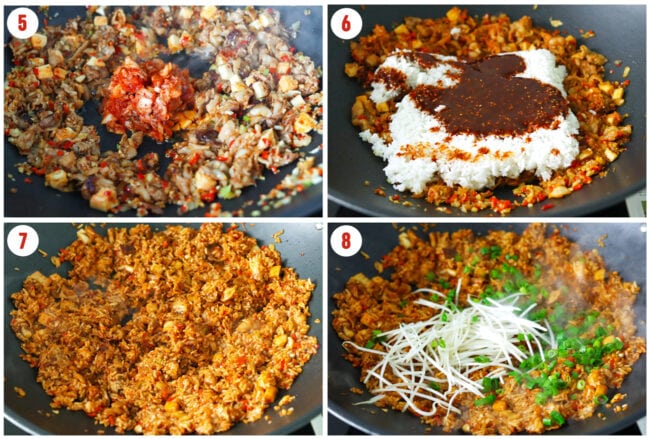
5. Add the kimchi. Make a well in the center of the wok again and add the kimchi and kimchi juice. Stir-fry in the center of the wok. Then toss to combine with everything.
6. Add the rice and sauce. Stir-fry using a scooping motion until everything is evenly coated in the sauce.
7. Season. Season with kosher salt and freshly cracked black pepper and toss to combine. Then let everything sit for a few seconds before tossing again. This helps the rice to get a little crisp in some parts and prevents it from becoming mushy. Repeat this process again.
8. Toss through spring onion green and bean sprouts. Then switch off the heat.
9. Serve! Divide the fried rice evenly onto plates or in bowls and drizzle a little sesame oil on top. Garnish with toasted white sesame seeds and chopped spring onion. Top each serving with a fried egg and sprinkle shichimi togarashi on top of the egg if desired. Then serve and enjoy!
Full detailed instructions are in the recipe card below.
Cook’s Tips
- Prepare all the ingredients before you start cooking. This kimchi fried rice is ready in a matter of minutes. It’s best to have everything prepared and by the side of your wok before you turn on the heat.
- Get your wok or pan SCARY HOT! The key to making a good fried rice, and particularly this one because of the seasoning sauces and wet kimchi is high heat. You want to stir-fry the rice without it becoming mushy so high heat is key. If it gets too hot and smoky, you can adjust the heat as it cooks. But do not cook on low heat as it will become soggy.
- Adjust spice level to taste. If prefer to make this milder, use less gochujang for the fried rice sauce (1 tablespoon), gochugaru (half teaspoon), and less fresh red chilies (to taste).
FAQs
Traditionally, leftover short grain white Korean rice is used to make kimchi fried rice in Korean households and restaurants. However, I find that day old long grain rice works well for all types of fried rice recipes. Hence, I use day old cold Thai Jasmine rice because I always have it on hand.
In spite of the deep red and orange shades from gochujang and kimchi, kimchi fried rice is actually not super spicy. It’s a well-balanced dish with spicy and sour flavors, though you can make it as spicy or mild as you like by dialing back or increasing the amount of the spicy ingredients (fresh chilies, gochujang, and gochugaru).
Yes, you can. Do note that the flavors will be different as gochujang adds smoky hot notes and umami. It balances out the acidity from the sour kimchi. However, there’s plenty of umami and funky delicious flavors coming from the kimchi, so it wouldn’t be lacking in flavor at all.
It will last for 3 days if stored properly in a sealed airtight container in the fridge. Reheat in the microwave on high for 1-2 minutes until hot throughout.
Variations
- Use a bag of frozen veggies or other veggies. Even a cup of bagged frozen vegetables like carrots, corn, and peas would work well in this kimchi fried rice. Other fresh veggies ideas are finely chopped carrots, chopped napa cabbage (wom bok/ Chinese cabbage), or small chopped brown button mushrooms.
- Use a different protein. If pork belly is not your thing, make a bacon or spam kimchi fried rice instead! Alternatively, use diced boneless and skinless chicken thighs or breasts, shrimp/prawns, or thinly sliced beef strips (hotpot/shabu shabu style beef or sliced flank steak).
- Make it vegetarian/vegan. Use vegan kimchi and crispy pan-fried tofu cubes instead of pork belly. Or use a plant-based meat substitute.
- Make it gluten-free. Use a gluten-free gochujang, kimchi, and soy sauce (or tamari).

More Fried Rice Favorites
- Spicy Thai Basil Chicken Fried Rice
- XO Sauce Fried Rice (with char siu pork and shrimp)
- Garlic Salmon Fried Rice
- Spicy Thai Pork Fried Rice
- Or browse the entire Fried Rice recipe collection.
More Korean & Korean-inspired Recipes
- Stir-fried Kimchi Chicken Noodles
- Spicy Korean Pork Stir-fry
- Creamy Spicy Korean Udon Noodles with Bulgogi Chicken
- Or browse the entire Korean recipes collection.
MADE THIS RECIPE? Please leave a comment and a ⭐️⭐️⭐️⭐️⭐️ star rating below and let me know how you liked it! You can also take a photo and tag it with @thatspicychick on Instagram and hashtag it #thatspicychick. I love seeing your creations!
STAY CONNECTED! You can also follow me on Pinterest, Facebook or Instagram.
Sign up for my email list to get my latest recipe in your inbox weekly!
Kimchi Fried Rice with Pork Belly

An easy to make one wok Korean fried rice that is full of BIG and BOLD flavors and ready in under 30 minutes! It’s made with thinly sliced pork belly meat, kimchi, fragrant aromatics, a few veggies, and the most delicious gochujang infused spicy, smoky, and tangy sauce with a hint of sweetness!
- Prep Time: 15
- Cook Time: 12
- Total Time: 27 minutes
- Yield: 4 1x
- Category: Dinner
- Method: Stir-fry
- Cuisine: Korean
Ingredients
For the Kimchi Fried Rice with Pork Belly:
- 2 TBLS Canola Oil (or any neutral flavored cooking oil with a high smoke point)
- 4 large Eggs
- ½ medium Yellow Onion – finely chopped
- 1 large Spring Onion – finely chopped, white and light green parts separated from dark green parts
- 6 Garlic cloves – minced
- 2 TBLS grated Ginger
- 2 – 12 Red Chilies (Thai Bird’s Eye chilies or any other small hot red chilies), to taste – finely chopped
- 1 piece (about 100 – 130 grams / 3.5 – 4.5 ounces) King Oyster Mushroom – sliced into ¼-inch wide discs, then cut into 1-cm cubes
- ¾ cup Kimchi + 1-2 TBLS Kimchi Juice (liquid from kimchi jar) – chopped
- 1 cup Mung Bean Sprouts – rinsed and drained
- 3 cups cooked Long Grain Rice (Such as Thai jasmine rice. Cold day-old rice works best.)
- ½ TSP freshly cracked Black Pepper, to taste
- ¼ TSP Kosher Salt, to taste
- To Serve: Toasted white sesame seeds, reserved spring onion dark green parts, fried egg, sprinkling of shichimi togarashi (Japanese assorted chili pepper) for the egg
For the Pork Marinade:
- ½ TBLS Gochujang
- ½ TBLS Low Sodium Light Soy Sauce
- ½ TBLS Korean Sake (optional)
- ¼ TSP freshly cracked Black Pepper
- 1 TSP Sesame Oil
- 215 – 240 grams / 7.5 – 8.5 ounces thinly sliced Pork Belly (hotpot/shabu shabu style meat) – cut into 1.5-inch wide strips
For the Sauce:
- 2 TBLS Gochujang
- 2 TBLS Low Sodium Light Soy Sauce
- ¾ TBLS Distilled White Vinegar
- 1 TSP Sesame Oil
- ½ – 1 TSP Chili Oil (optional – pure chili oil without flakes/seeds), to taste
- 1 TSP Gochugaru, to taste (substitute with chili powder if unavailable)
- 1 TSP Toasted White Sesame Seeds
- 1 TSP White Sugar, to taste
Instructions
Prep:
- Prepare all the fresh ingredients: Chop the yellow onion, spring onion (separate the white and light green parts from the dark green parts), garlic, red chilies, and king oyster mushroom as indicated in the ingredients section. Grate the ginger directly into a small bowl, and spoon the kimchi and kimchi juice into a small measuring cup. Use kitchen scissors to cut the kimchi into small pieces in the cup. Rinse and drain the mung bean sprouts. Set everything aside.
- Marinate the pork belly: Combine the gochujang, low sodium light soy sauce, Korean sake (if using), freshly cracked black pepper, and sesame oil in a medium sized bowl. Mix until combined well. Slice the pork into 1.5-inch wide strips and add to the bowl. Mix until the pork is evenly coated in the marinade, then set aside.
- Make the sauce: Whisk together the gochujang, low sodium light soy sauce, distilled white vinegar, sesame oil, chili oil (if using), toasted white sesame seeds, and white sugar in a small measuring cup (for easier pouring) or bowl until evenly combined.
For the Kimchi Fried Rice with Pork Belly:
- Fry the eggs: Heat 2 tablespoons of oil in a large wok or heavy bottomed deep frying pan over medium-high heat. Once the oil is hot, crack the egg into it and cook, spooning the surrounding oil over the top as it fries, until your desired doneness for the yolk is reached. Transfer to a paper towel lined plate and set aside. Repeat with the remaining 3 eggs.
- Sauté onions: Add 1/2 tablespoon of oil to the wok if needed and heat over high heat. Once hot, add the yellow onion and spring onion white and light green parts. Sauté until translucent – about 30 seconds.
- Add aromatics: Add the garlic, ginger, and red chilies. Stir-fry for 30 seconds until fragrant.
- Cook the pork: Make a well in the center of the wok by pushing everything to the edges of the wok. Add the marinated pork and spread the pieces out in the center of the wok. Let the pork sear for about a minute before flipping the pieces over and allowing the other side to sear for 30 more seconds. Then stir-fry to combine everything.
- Cook the mushrooms and kimchi: Add the chopped king oyster mushrooms and stir-fry for a minute to combine with everything until slightly softened. Make a well in the center of the wok again and add the kimchi and kimchi juice. Stir-fry in the center of the wok so that there is direct contact with it for 20 seconds, then toss to combine with everything.
- Add the rice and sauce: Add the rice and pour the sauce on top. Stir-fry using a scooping motion until everything is evenly coated in the sauce.
- Season: Season with kosher salt and freshly cracked black pepper. Toss to combine, then let everything sit for 15-20 seconds. Then toss everything again and let everything sit for another 15-20 seconds. This helps the rice to get a little crisp in some parts and prevents it from becoming mushy.
- Toss through spring onion greens and bean sprouts: Add the spring onion green parts and bean sprouts. Toss to combine for 15-20 seconds until the bean sprouts have slightly softened, then switch off the heat.
- To Serve: Divide the fried rice into four plates/bowls and drizzle a little sesame oil on top. Garnish with a sprinkling of toasted white sesame seeds and the remaining spring onion dark green parts. Top each plate/bowl with a fried egg and sprinkle shichimi togarashi on top of the egg if desired. Serve immediately.


Notes
- Gochujang and gochugaru. Gochujang is a fermented Korean chili pepper paste that comes in small tubs. In spite of its deep dark red color, it’s not extremely spicy. It has a spicy-sweet and smoky flavor profile. Gochugaru is a Korean hot pepper powder. Look for them in the Asian aisle of supermarkets or in Asian and Korean supermarkets. Depending on the brand, gochugaru can come in varying heat levels. Adjust quantity to taste, or substitute with chili powder instead.
- Kimchi and kimchi juice. Kimchi is a Korean spicy fermented cabbage that comes in either jars, cans, or packages. It’s usually made with cabbage, radish, sometimes carrots, as well as plenty of other seasonings such as fish sauce, gochugaru, garlic, and ginger. Look for it in the fridge section of some large supermarkets that are well-stocked with international ingredients, or in Asian and Korean supermarkets. Depending on the brand and how old the kimchi is, the degree of sourness will vary. Kimchi juice is the liquid at the bottom of the package or jar of kimchi and not a separate ingredient. Your jar may not always have a lot of kimchi juice, so add more distilled white vinegar if more sour flavors are needed.
- Adjust spice level to taste. If you prefer to make this milder, use less gochujang for the fried rice sauce (1 tablespoon), gochugaru (half teaspoon), and less fresh red chilies (to taste).
- Storage and leftovers: Store in a sealed airtight container in the fridge for up to 3 days. Reheat in the microwave for on high 1-2 minutes until hot throughout.
- See ‘Variations’ section above if you’d like to customize this kimchi fried rice.
Nutrition
- Serving Size: 1/4 of recipe
- Calories: 603
- Sugar: 13.3g
- Sodium: 1153.2mg
- Fat: 33.6g
- Saturated Fat: 2.7g
- Unsaturated Fat: 12.4g
- Trans Fat: 0g
- Carbohydrates: 58.2g
- Fiber: 3.5g
- Protein: 18g
- Cholesterol: 186mg
This post may contain affiliate links. We are a part of the Amazon Services LLC Associates Program, an affiliate advertising program designed to provide a means for us to earn a small commission (at no extra cost to you) by linking to Amazon.com and affiliated sites. The nutritional information provided is approximate and can vary based on several factors. It should only be used as a general guideline. For more information, please see our Disclosure.