Chili Garlic Shrimp
This post contains affiliate links.
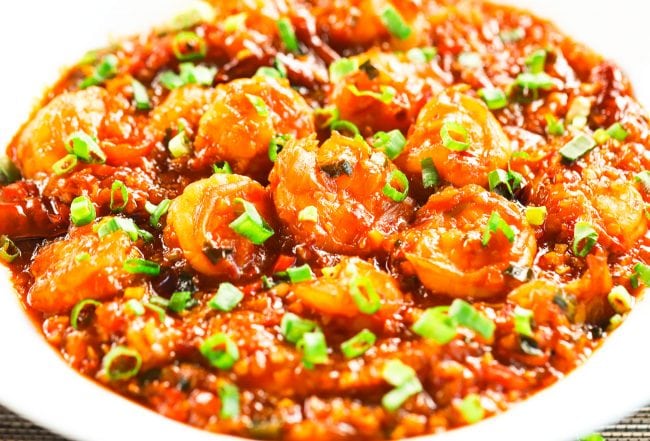
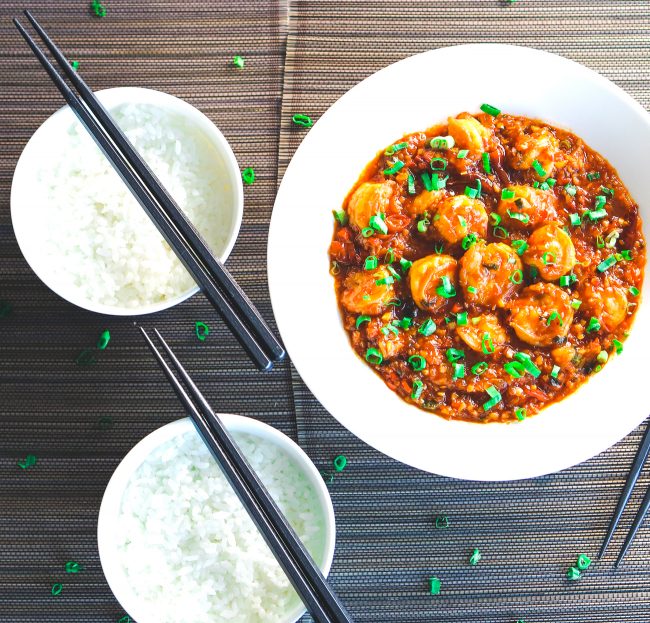
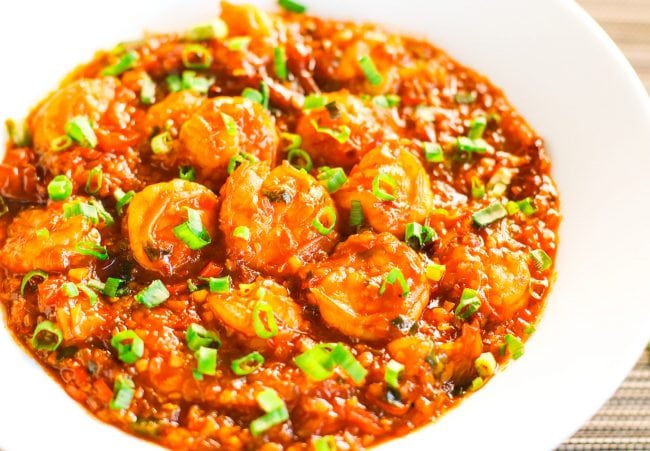
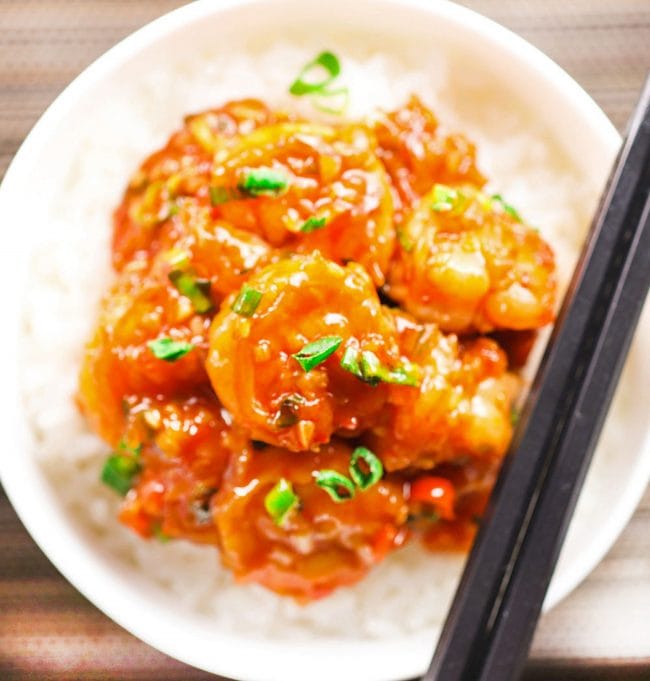
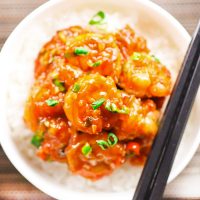
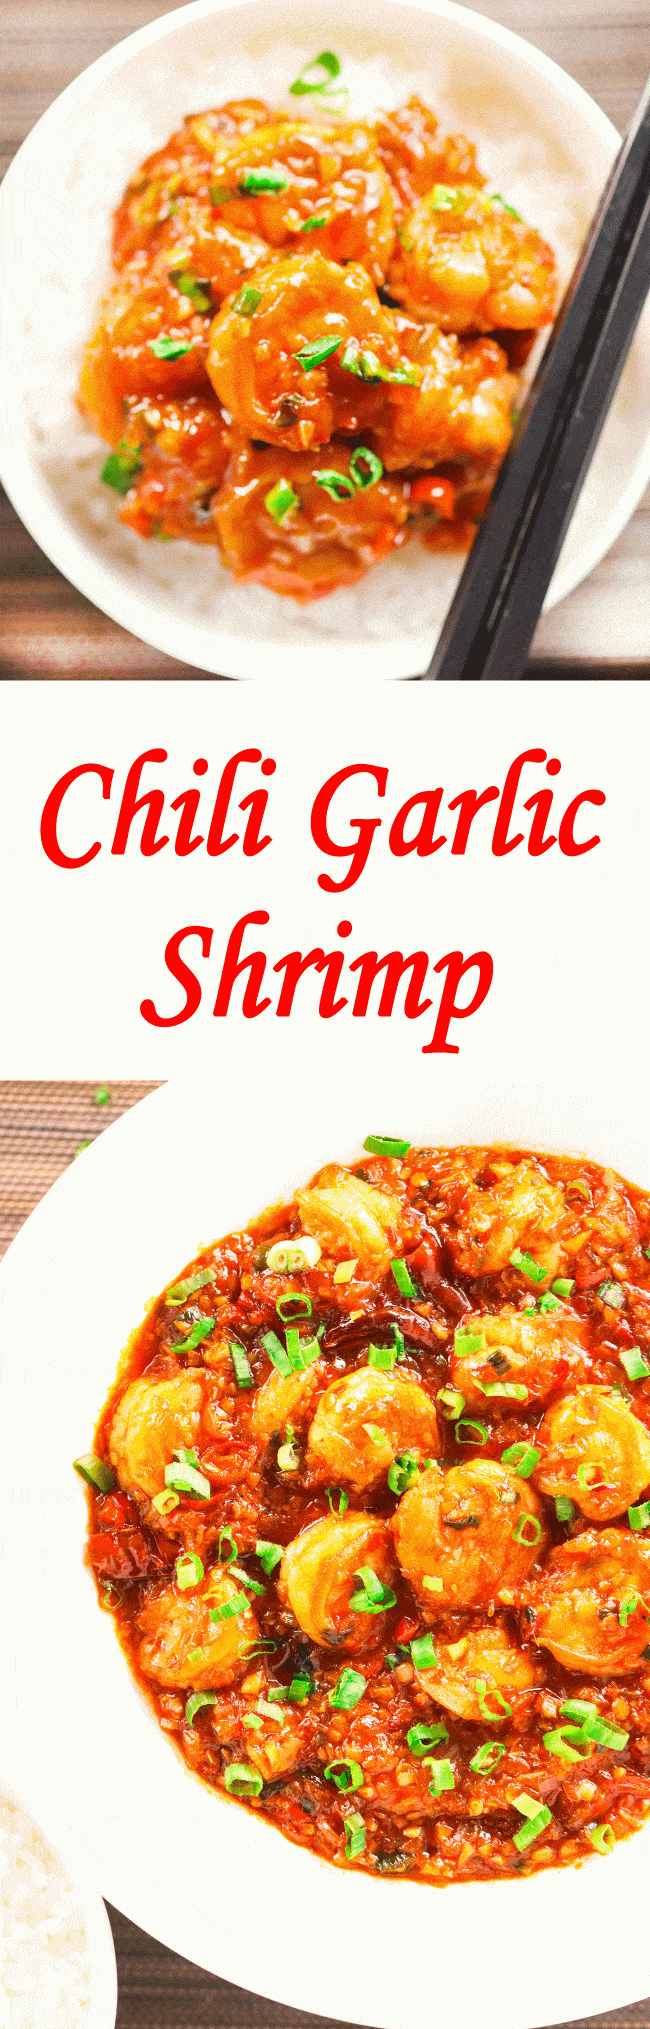
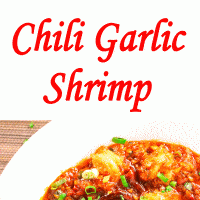
This Chili Garlic Shrimp is a quick and easy recipe that’s perfect for busy weeknights! Juicy shrimps get stir-fried in a spicy-sweet and sticky garlicky sauce. Serve on a bed of warm steamed rice and a side of steamed or stir-fried veggies to make it a full meal!

Hi friends! 👋
Today’s recipe is a quick Asian stir-fry and one of my absolute favorites! Why? Because it’s quick and easy to make (duh!) and perfect for those weeknights when you’re just too exhausted to spend too much time in the kitchen and just wanna eeeeeaaaat. And, well, you can never have too many quick weeknight go-to recipes on hand, amIright or amIright? 😉 🙌
I present to you my Chili Garlic Shrimp! This baby embodies my cooking style perfectly – a little bit spicy, a little bit sweet, and a whole lotta flavor and oomph! 👊
A lot of Chinese restaurants I dine at have this on the menu. I was inspired to create my own homemade version a couple of years ago because it’s been a longtime favorite of mine. In fact, there has never been a time I haven’t ordered it while dining out and it’s available on a restaurant menu.
Juicy shrimps in a spicy-sweet sticky garlicky sauce on a bed of warm steamed rice = yummy! This Chili Garlic Shrimp recipe is just what you need when you: a. want to eat soon b. don’t want to order takeaway c. simply can’t be arsed with spending hours chopping, cooking, washing up, etc. 🤪
If you’ve read my Spicy Kung Pao Chicken post, you’ll know that all that my stir-fry recipes need is a bit of organization and prepping before you start cooking. So when you do start cooking, you have everything you need by your side and just need add the right ingredients to the wok at the right time and stir-fry! For this Chili Garlic Shrimp, all you have to do is:
- Chop up the aromatics and fresh ingredients
- Make the sauce bowl
- Marinate the shrimp (btw, you can also use diced chicken breasts instead of shrimp if you like)
- …and then get cooking!
THE SAUCES AND OTHER INGREDIENTS
I use readymade bottled Thai Sweet Chili Sauce by Amoy and Chili Garlic Sauce by Lee Kum Kee in this dish. Why I like them? They’ve both got all the ingredients needed for this recipe – like vinegar and sugar – already incorporated in them. Plus, they taste fantastic together when stir-fried with the shrimp!
I particularly like the Amoy brand for Thai Sweet Chili Sauce because it’s not as sweet as some of the other brands I’ve tried. It might be difficult to locate outside of Asia, but any other Thai Sweet Chili Sauce will work just fine. Its main purpose is to produce a sweet and sticky glaze for the shrimp. If you have a favorite brand for this sauce already, go with that. Otherwise, feel free to experiment with different brands until you find one that you like best.
For the Chili Garlic Sauce, Lee Kum Kee comes to the rescue once again! It’s not super sweet so the dish doesn’t get overpowered or become sickly sweet when combined with the Thai Chili Garlic Sauce. Plus, it has a bit of heat because it has salted chilies and also a really nice garlicky kick! You can substitute with Huy Fong’s Chili Garlic Sauce if you like or any other brand that produces an Asian style chili garlic sauce that is not super sweet. Both of these sauces can be found at Whole Foods, Target, and Asian Grocery stores.
Aside from the above two mentioned sauces, you’ll need some light soy sauce (I use low sodium), Shao Xing Rice Wine, and a bit of sesame oil. These should be easy to locate in your local supermarket, but try an Asian grocery store if your local supermarket does not have Shao Xing rice wine.
The rest of the ingredients in this recipe are everyday ingredients which you probably already have at home or can get on your next grocery shopping trip.
CAN I MAKE THIS LESS SPICY?
The Thai Dried Red Chilis are a matter of preference so if you prefer less heat, deseed them or omit them entirely. Same goes for fresh red chilies – you can deseed them if you like. Your call for the additional heat elements, but trust me when I say you’ll love this with or without them!
CAN I MAKE THIS VEGETARIAN?
Sure! To make this veg, use a combination of your favorite stir-fry friendly veggies (like mushrooms, snap peas, etc.) or pan-fry some tofu with salt and pepper and add them to the sauce in place of the shrimp.
So what are you waiting for?! Get your ingredients ready and get cooking! Then sit back, relax, and enjoy your speedy and delicious weeknight meal! 😘
PS: If you’re looking for more Asian shrimp recipes, check out my Easy Spicy Thai Shrimp Cakes and Spicy E-fu Noodles with Shrimp recipes!
PrintChili Garlic Shrimp
This Chili Garlic Shrimp is a quick and easy recipe that’s perfect for busy weeknights! Juicy shrimps get stir-fried in a spicy-sweet and sticky garlicky sauce. Serve on a bed of warm steamed rice and a side of steamed or stir-fried veggies to make it a full meal!
- Prep Time: 20
- Cook Time: 20
- Total Time: 40 minutes
- Yield: 3-4 1x
- Category: Dinner
- Method: Stir-fry
- Cuisine: Chinese
Ingredients
CHOPPING
- 7 Garlic cloves – minced
- 2 TBLS Ginger (about 1.5″ chunk) – minced
- 5-8 Fresh Red Chilies, or to taste – chopped*
- ½ Yellow Onion – minced
- 2 Spring Onions (Scallions) – chopped, whites & greens separated
SHRIMP MARINADE
- 1.5 TSP Corn Starch
- 3 TSP Low Sodium Light Soy Sauce
- 2 TSP Shao Xing Rice Wine
- ¼ TSP Sesame Oil
SAUCE BOWL
- 1 TSP Corn Starch
- 4 TSP Low Sodium Light Soy Sauce
- 4 TSP Shao Xing Rice Wine
- 3 TBLS Thai Sweet Chili Sauce
- 3 TBLS Water
OTHER
- 4 & ½ TBLS Peanut Oil (or any other oil with a high burning point)
- 1 TSP Chili Oil (optional)
- 1 TSP Sesame Oil
- 400g Shrimp, fresh or frozen – peeled, tails removed, and deveined
- 3 TBLS Chili Garlic Sauce (Lee Kum Kee preferred, but any Asian style chili garlic sauce will do)
- 2-4 Thai Dried Red Chilies, or to taste – Cut into halves and thirds depending on length
- 2-3 TBLS Water
Instructions
Prep:
- Chopping: Chop all your ingredients. Add the garlic, ginger, and spring onion whites to a small bowl. Add the fresh red chilies and spring onion greens into two separate small bowls. (Discarding the chili seeds is optional and depends on your personal heat preference.)
- Shrimp Marinade: Mix together the corn starch, low sodium light soy sauce, shao xing rice wine, a dash of sesame oil in a large bowl. Add the shrimp and mix to coat them in the marinade. Set aside to marinate while you prepare the other ingredients.
- Sauce Bowl: In a medium bowl, add the corn starch, low sodium light soy sauce, shao xing rice wine, and Thai Sweet Chili Sauce. Mix thoroughly and set aside.
- Thai Dried Red Chilies: Cut the chilies in halves or thirds depending on their size. Cut the longer ones into three pieces and the shorter into two.
- Prep for Marinated Shrimp: Turn on the stove and let your wok or large pan heat up for 20 – 30 seconds. Then, add about 3 tablespoons peanut oil and a dash of sesame oil. Lift the wok and swirl it in a circular motion so that the oil spreads around the perimeter and then place it back on the stove to let it heat up. Once hot, add the shrimp and spread evenly in the wok. Cook on one side for about 40 seconds then flip and cook on the other side for 40 seconds more. Toss them around and then remove the shrimp to a fine mesh strainer and hold above the wok to let the oil drain. (You can gently shake the strainer to speed up the draining process, but be careful not to shake to violently as that’ll cause some of the cornstarch to come off and make the shrimp a bit mushy. Remove the shrimp into another clean large bowl and set aside. Discard the oil in the wok and wipe with paper towels. Set back on stove.
For the Chili Garlic Shrimp:
- Turn on the stove and set to medium high heat. Add 1 & ½ TBLS peanut oil, 1 TSP chili oil (if using), and about a TSP of sesame oil. Once the oil is hot, add the garlic, ginger, and spring onion whites. Give it a quick stir to prevent the garlic from burning.
- Add the onion and stir-fry until fragrant- about 1-2 minutes.
- Turn the heat up and add the Thai dried red chilies. Stir-fry.
- Add the fresh red chilies and continue stir-frying
- Add the shrimp and the Chili Garlic Sauce on top of them. (Note: not the contents of the sauce bowl you prepared earlier but the actual bottled sauce.) Toss to combine with everything else in the wok.
- Make sure the shrimp is well distributed around the wok. Then, give the sauce bowl a stir with a spoon (the corn starch will have clotted up at the bottom of the bowl) and pour in the sauce in a circular motion to coat as many of the shrimp pieces. Continue stir-frying and tossing for a minute. Add 2-3 tablespoons of water as the sauce will start to dry. Stir.
- Once the sauce starts to thicken again – after about 30 seconds, add ¾ of the spring onion greens and toss to combine – about 30 seconds.
- Turn off the heat. Remove to dish and garnish with the remainder spring onion greens. Serve with steamed white rice.


Notes
- Deseed the Fresh Red Chilies and the Thai Dried Chilies if you prefer the dish to be less spicy.
- The Thai Sweet Chili Sauce that goes in the Sauce Bowl is the sweet Thai style chili garlic sauce. I use Amoy brand because it’s not too sweet for me, but there should be a couple of options for this sauce at Whole Foods, Target, and your local Asian Grocery Store. Go with your favorite brand if you’ve used this type of sauce before. Otherwise, experiment with a couple of different brands to see which one you like best!
- Pro-cook tip: You can save even more time with this already super speedy recipe by using shrimp that has already been peeled & deveined.
- To make this veg, use a combination of your favorite stir fry friendly veggies (like mushrooms, snap peas, etc.) or pan-fry some tofu with salt and pepper and add them to the sauce in place of the shrimp.
- If you prefer to use chicken, dice some boneless skinless chicken breasts into bite sized pieces to replace the shrimp. Both shrimp and chicken taste amazing in this sauce!
Nutrition
- Serving Size: 1 bowl
- Calories: 353
- Sugar: 9.3g
- Sodium: 1225.9mg
- Fat: 19.6g
- Saturated Fat: 3.2g
- Unsaturated Fat: 14.8g
- Trans Fat: 0g
- Carbohydrates: 22.5g
- Fiber: 2.8g
- Protein: 21.8g
- Cholesterol: 168mg
This post contains affiliate links.
This post may contain affiliate links. We are a part of the Amazon Services LLC Associates Program, an affiliate advertising program designed to provide a means for us to earn a small commission (at no extra cost to you) by linking to Amazon.com and affiliated sites. The nutritional information provided is approximate and can vary based on several factors. It should only be used as a general guideline. For more information, please see our Disclosure.


Wow, i made this it came out sooo good. Thanks for sharing.
Fantastic, Rita! Glad this recipe worked out wonderfully for you and that you enjoyed it!
Too good
Thanks Jaya!
Can’t believe I was able to make restaurant quality shrimp at home. I cut the Thai sweet chili sauce to 1 Tbsp because I can’t eat a lot of sugar, and it was delicious. Didn’t have chili garlic sauce so used sambal oelek, which worked but was kind of one-note.
So glad this recipe worked out for you Jo! Thanks for sharing the changes you made and leaving a comment. 🙂